Turmeric belongs to to the ginger plant family, and is one of the most famous foods in the world. This is due to its versatility in cooking and its medicinal qualities. I grow a ton of turmeric every year, and you can too- just follow these key points.
Scientific tests have shown that turmeric stimulates cancer-fighting genes in human cells, and that the best way we can ingest it is via the food we eat. The entire turmeric plant is edible; leaves can be used as a wrap for fish, flowers can be added to salads plus of course the root is thought to have a variety of health benefits, including anti-inflammatory properties.
Health qualities aside, I just love it because it adds so much flavour to home cooking & tastes great. You can also take turmeric in tablet or supplement form, but research shows that fresh is best.

Planting
Turmeric is a really hardy crop. It’s so tough that it’ll find a way to grow if if you neglect it. Having said that, turmeric will give you a better crop with some care and attention.
Turmeric loves a lot of food, so prepare the soil before planting with compost and fertiliser. If you don’t have compost, you can substitute worm castings, cow or horse manure or all-purpose pelleted fertiliser. I like to sprinkle a few handfuls of blood and bone over the soil as well. Similar to the requirements of carrots, the soil needs to be crumbly, free-draining, and well-tilled. If the soil is too hard or compacted the turmeric root will find it hard to expand and can even rot before it gets going.

Just like ginger, turmeric plants grow from pieces of turmeric root, called rhizomes. Rhizome pieces of about 2-3″ square are the ideal size for planting. Smaller pieces will grow but bigger pieces will grow better because they have greater energy reserves.
Plant your turmeric about 6″ apart and about 2″ under the soil surface. Once it’s planted, mulch over the top of the soil to retain moisture and stop weed competition. I use sugar cane or woodchip mulch, and make this layer about 2-3″ thick.

Water & Climate
Turmeric (curcuma longa) originates in south-east Asia, which is primarily a subtropical climate. It is a perennial herb to 1 metre (3′) height that loves heat and moisture, and copes well with humidity. Good drainage and lots of water are important for a good turmeric crop- remember it can easily rot from having wet feet. If growing in pots you’ll need to water at least once a day as they’ll dry out quickly in summer.
Grow turmeric at the hottest time of year in a position where it has plenty of sun. It is best suited to USDA zones 8-11 and is sensitive to both drought and frost, so warm temperate and subtropical climates are best. Those in colder climates might be able to try turmeric in a greenhouse in summer as long as frost won’t be an issue.
Turmeric will usually flower after several months growth. The flowering depends on your climate and growing conditions. The longer you leave your turmeric plants, the more likely they are to flower.

Growing Area
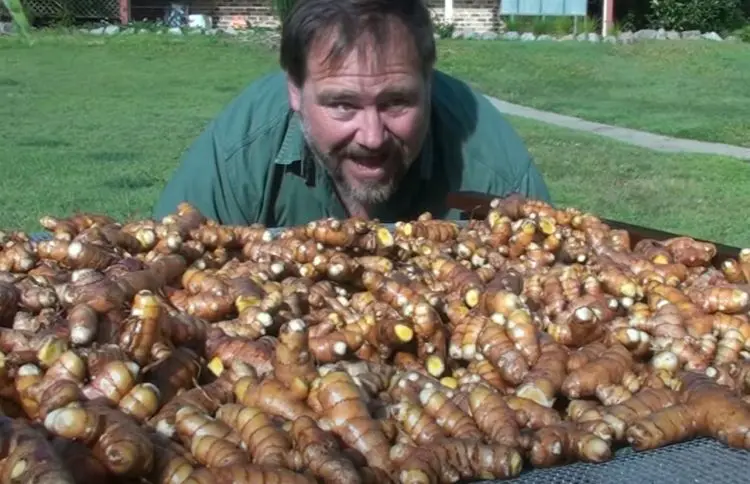
Turmeric is highly productive for the amount of growing space the plant uses- but being a sort of root crop, the size of the harvest will be dictated by the amount of space it has to grow. A 3 x 3′ (1 metre square) space will produce an enormous pile of turmeric, as demonstrated in our video linked below. If you’re very short on space, never fear- turmeric grows perfectly well in pots, containers and buckets.
Crop rotation isn’t a huge issue with turmeric. In my experience you only need rotate it every 2 or 3 years to negate soil depletion & pest build-up. If bugs like worms, borers and slugs have attacked your turmeric then it will benefit from a fresh start in another position with new soil.
Harvesting
When turmeric plants have died back fully, it is time to harvest. This usually takes 7-10 months. Waiting until the roots are fully mature gives a better-tasting product which will store for longer. It is important not to harvest turmeric too early, as the plant transfers a large amount of energy into the rhizome during the die-back stage. This is when the plant is preparing to become dormant so is creating a large food source for itself.
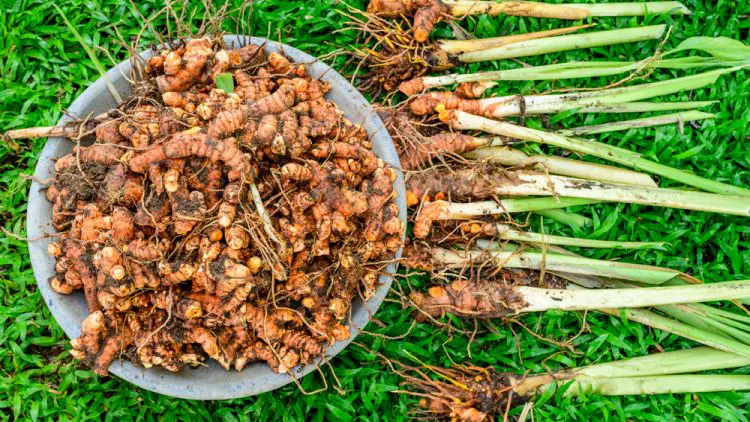
Pull the old dead turmeric stems out and put them aside to use as mulch for the next planting. Carefully dig up the rhizomes with a garden fork. It’ll come out in clumps which will separate with a bit of jiggling. Make sure to harvest your turmeric before the next season starts in spring- otherwise it’ll all start shooting & you’ll have turmeric growing over the top of turmeric.
You’ll notice two distinct parts of the rhizome: the central ‘mouse-shaped’ part which has roots coming off it, and the ‘finger’ parts. Okay that’s just my terminology, but you get the idea! I prefer to keep the centre section for replanting because they’re not as rich & tasty as the fingers.
Turmeric stores quite well in the pantry or fridge for several weeks. To keep it longer, make it into a powder, spice paste, add to pickles or freeze it. To store turmeric pieces for replanting, simply place in a box or bag with some sand or mulch.
And that’s how to grow a ton of turmeric! If you’d like a visual as well check out our youtube video below.