The recent fires have been devastating for all concerned. Not only in the usual ways, but for many less obvious reasons also.
One less obvious reason is the pollution of the garden soil where buildings once stood.
The top layer of soil is now covered with ash made up of all that a building was built from and contained.
That building may have been a house, shed, chook pen, garden shed, or a vehicle was there, etc.
All the toxic remnants of all the stuff housed in and around that building now lay combined with wood ash on the ground.
Even an organic veggie garden may now contain so many toxic remnants, as to render it unusable in future.
For example, shade cloth, plastic buckets and various other containers such as plastic plant pots, the materials forming a shade house structure, fire fighting foam, fire retardant, all now lay as microscopic fragments and heat altered chemicals, combined with ash in and on the top layer of earth.
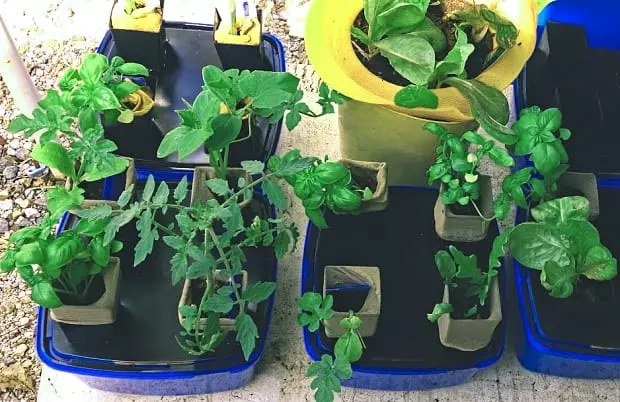
Simple hydroponic setup in reused icecream containers (image above)
Apart from the earth having been roasted beyond life, this cocktail of toxic elements will need to be removed. If the area was water bombed or hosed with lots of water, all those toxic elements may have been washed down into cracks in the soil’s surface. So not only the top few centimetres but maybe down to 30cm may need to be removed to find unpolluted soil.
You may choose to do this once you have returned to your new or repaired home, but in the short term, it may not be practical to take this route. One reason is finding unpolluted soil to fill the hole created when you dug out all the polluted earth. With the fires having been so widespread in many areas, sourcing unpolluted soil could pose quite a dilemma. Another reason is sourcing enough unpolluted water to keep a whole garden bed well watered through the heat of summer.

Garden beds devastated by fires NSW 2020 (image above)
A short term solution could be a simple form of hydroponics using purchased or caught drinking water.
Over the last week, I have started such a test. I decided to use a $100 gift voucher I was given to fund the test. My challenge was to grow as much food as I could, using components available at any common hardware store plus make use of found and recycled materials.
Plastic buckets and containers with lids would be everywhere that food is being prepared. I decided on 4lt ice cream containers to start my simple hydroponic system.
Once my plants had a good root system, I would transfer them into larger buckets.
Water could be a concern as it needs to be unpolluted and hygienic. It’s one reason I started 4 plants in each container, so as to maximise use of the volume of water for as many plants as possible. It might mean a little bit extra work potting on the plants as they grow, but it would ultimately use less water.
You could catch rainwater directly from the sky by stringing up a small 2mx2m tarp on some star pickets and angling it down on one side so the water runs off into a bucket. Make sure it’s not under burnt trees, otherwise, buying cheap drinking water in the largest container possible is an alternative.
The following images show how to set up a simple non-recirculating system.


I began with the simplest single part nutrient, pH Up and pH Down, the best seedling pots I could find at my hardware store, a fresh bucket, seedlings, a box cutter knife, one block of Coir Peat and a pack of 10 knee-high stockings from the supermarket.
As your plants grow you will then need several other buckets of around 10-20lt volume, something of around 1-2lt volume to use as a dipper, the 2lt or 4lt ice cream containers or similar. Other suitable containers might be those that commercially prepared food came in for the food prep for volunteers and inhabitants of the towns affected. That might be potato salad, coleslaw, ice cream, mayonnaise, yoghurt, tahini or similar spreads etc. The containers must have well-fitting lids.
I cut holes in the lids to suit the little pots I purchased into which the new seedlings would be set for their first few weeks of growth. The “big-box” hardware store I went to didn’t have the correct type of mesh pot for hydroponics so I used tall seedling pots instead. I made a template 42mm square and having cut one out, I used that template then to trace out all the others I needed to cut from the lids.
I lined the pots with the stockings which I had cut in half making 20 pouches. Each stocking had a toe section that was ready to go and a leg section that needed a little knot tied in the very end where it had been cut.

Cucumbers and watermelons already have roots in solution after just 5 days (image above)
The hardware store also didn’t have the clay beads usually used to support plants in hydroponics. So I decided to use Coconut Coir because it is inert having a natural pH of around 6-7 which is just right for hydroponics. If you choose to use gravel, be very careful it isn’t polluted by fall out from the fires.
Also, take a small glass jar along with some plain vinegar. Put half a handful of your chosen gravel into the jar and cover with the vinegar. Apply the lid, shake a little and wait a few minutes. If tiny bubbles begin appearing on the gravel then it is too alkaline for use in hydroponics. It will always be making the solution far too alkaline because the gravel is calcium-based.
The hydroponic solution needs to be as close to neutral as possible. Coconut Coir is neutral although it stains the water that isn’t a problem. The water used to make the nutrient should be as neutral as possible. The hydroponic solution will acidify the water a bit in many cases once your containers are made up, but waiting overnight before checking the pH may allow time for the coco peat to neutralise it naturally. Rainwater in Australia is now fairly acid so be aware that your nutrient might appear acid, but again if you wait overnight the coir might restore a pH of around 6-7.

Rainwater straight from the sky in Queensland is very acidic (image above)

Coir soaked in rainwater raising pH to neutral 6.5 overnight (image above)

pH is raised to 6.5 overnight negating the need for chemical pH UP product
The reasons for the lids are many:
1: so the pots can sit with their bottoms just touching the nutrient;
2: the container of nutrient can be sealed to prevent pollutants from entering the water;
3: prevent evaporation;
4: help avoid spillage.
Wash the potting mix off the seedling roots gently in half a bucket of rain or drinking water. Seedlings are then planted into a stocking pouch. To fit them into the pots, gently mould into a sausage shape to fit down the pot. To get them going, 4 seedlings can be started in a 4lt container while 2-3 seedlings would be started in a 2lt container. Two seedlings could be started in a one-litre container. The plants need good airflow and light around them. To begin the growing cycle the plant doesn’t require much water volume but you don’t want to crowd the seedlings too much. The aim is to leave them in these small containers until they develop good root systems that may fill the well.
Once that’s achieved which should take 2-3 weeks, the plants are moved up to a larger volume bucket. Those started in the 4lt containers may need to be moved to 10lt buckets or the tomatoes may each need to be moved to an individual 20lt bucket. At this point, you will need access to much more water for this next phase. Having once accessed your water to fill the containers, they will only need topping up occasionally, but you will have many more containers now since your plants will be one or two to each container.
I chose the simplest type of nutrient I could find. It is a one-part solution so no mixing is required. A two or three-part nutrient is better, but in this case, we just want to keep everything as simple as possible and the one part solution will do the job just as well if you are careful to keep your whole setup hygienic and follow directions on the bottle. Hygiene is paramount in hydroponics. Always wash your hands before you start or touch any part of the hydroponics or the plants. Only use the fresh new bucket on the purchase list to make up your nutrient. Don’t use it for anything else. Wash your recycled containers thoroughly with soapy water then rinse in vinegar water very well. Don’t use recycled water to make the hydroponic nutrient. Only use drinking or rainwater to make hydroponic nutrient.

The nutrient water level in tub comes up to just above bottom of pots (image above)
Makeup half a bucket of water to wash the potting mix from the seedlings. Keep that bucket of potting mix as it can be used to start another little container garden growing another plant in the potting mix. Tip the water into yet another recycled container and keep for future use. There should be enough fertilizer in that potting mix to keep that plant growing for a few weeks and the water you drained off can be used to water it with.
If you would like to discuss anything about this article, the best way to interact with me is on our forum Self Sufficient Culture – I’ll be happy to answer your questions over there.
Direct link to the discussion of this article on the forum is here…