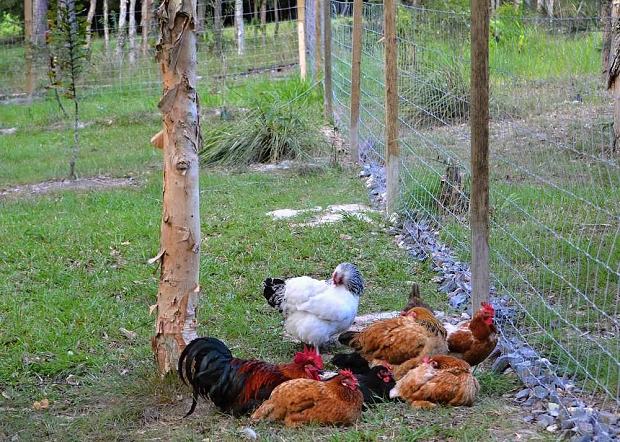
My DIY dog proof fence for my free-range chicken area is about 6 weeks old now and I am extremely happy with how it turned out. I could have paid several thousand dollars to have a fencing contractor come and do this job but I did it myself for a fraction of the cost that they would have charged me and at the same time I learnt a lot along the way…
The fence is almost exactly 200 metres in perimeter, has 57 x 2.4 metre 100 x 75 mil posts, a rubble rock trench base to make it very difficult for dogs to dig under, 142 cm high x 2.5 mil thick heavy duty galvanised dog mesh, with a 2.6 metre wide x 1.5 metre high welded alloy farm gate. This gives my hens and ducks almost a whole acre of land to free-range every day.
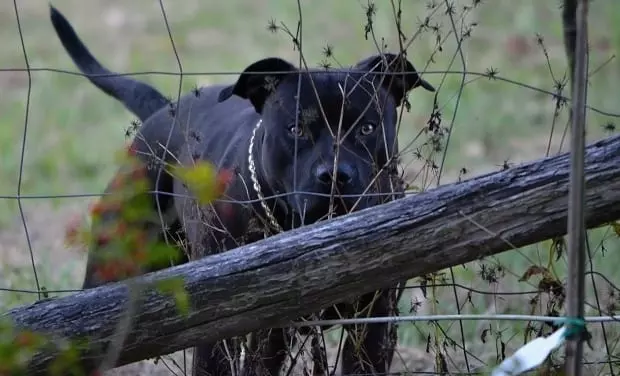
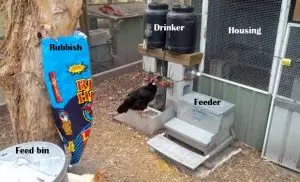
For years, we have had to put up with wild dogs, and neighbours dogs pushing through our boundary fence line and attacking our chickens and ducks and although I have a dog proof pen for my hens the problem has been protecting my birds when they are left out to free-range – until now.
Why not just fix my boundary fence? Well, it adjoins neighbouring properties and there are several complications that I won’t go into which inhibits making my boundary fence dog proof. Plus, I wanted to get this right and build it from scratch not patch an existing fence up and I needed to have full confidence this fence would do the job.
Also I don’t want my chickens roaming all over my property either, so I still needed a front fence to keep them away from other areas and the best option was to build a new perimeter fence line to make a safe free-range paddock for my hens to use. In the past, I have used some plastic mesh out the front to keep my poultry from coming up the hill but naturally it wasn’t dog proof and lately the hens started working out how to push under it themselves.
Electric fence?
The option of using an electric fence is fine but you still need to have a good fence to start with especially for poultry because they need to be kept in as well as dogs kept out. Furthermore, I personally don’t like electric fences because: I have young kids, I have a chicken friendly dog, and electric fences (as good as they may work) still do go down and require maintenance, so for those reasons it wasn't a "shock" to anyone that I decided to build a dog proof fence without the buzz…
No Pro at fencng
Now, I’m not a builder or professional fencing guy in fact this is the first ever proper fence I have made and whilst it may not be perfect or even conventional in the eyes of the pros I can say that it does the job and it looks pretty good too. So, if I can build a 200 m dog proof fence for my chickens completely on my own then I believe anyone can.
This article shows step by step how I built my first dog proof fence. I’m going to share with you all the lessons I have learnt along the way and give you some of my cost effective solutions to issues I came across.
The materials and cost of this fencing project are detailed at the end of this article.
Steps to building a dog proof fence
I’ve broken the building of my fence into 5 steps:
- Marking out the fence line and digging the trench.
- Digging the post holes.
- Putting the posts in the holes.
- Filling the trench with rubble rock.
- Tacking the wire or dog mesh fencing onto the posts and putting on the gate.
STEP 1 – Marking out the fence line and digging the trench

The first thing I needed to do was survey where exactly I wanted my fence to go. Since I have a lot of trees on my property, I needed to place each line so it had a relatively clear passage. I also wanted to include a few special areas that my chickens always like to go (like our big hollow tree) within the boundary.
Once I was happy with my roughly paced out line I used builder’s string between two marker posts to get a straight line for each side and then marked it with marker spray paint. I also tentatively marked where the posts would go at about 5 paces apart.
Then I started the arduous job of digging a shallow trench only 4 – 6 inches deep the whole way around. This trench was to hold my rubble rock which would deter dogs from digging under the fence. I was using a large shovel and pick or hoe but I ended up getting a guy on a mini digger to scrape the fence line for me using a 400 mil bucket attachment. That was a hell of a lot easier on my hands and saved a lot of time.
Step 2 – Digging the post holes

Manual and motorised post hole diggers (image above)
After completing the trench I marked out where each post would go by pacing 5 steps so about 5 metres apart.
I’m a glutton for physical work and I hate spending money hiring equipment so I initially used a manual posthole digger to dig the first 20 or so holes. After that, and knowing I had nearly 40 more to go, I caved in and hired a motorised posthole digger to save time and my upper body – crikey that was hard yakka!
The holes I dug were 600 mil deep and 200 mil wide.
Not all holes went to plan due to large tree roots etc so I needed to move some holes slightly to get a good dig rather than use all my time and energy cutting through tree roots.
Step 3 – Putting the posts in the holes

Posts into holes using a string line (image above)
The posts I used were treated pine H4 quality (H4 means can be buried) 2.4 metre long (giving me 1.8 metres above ground) 100 x 75 mil wide. I used 1 bag of rapid set postcrete for each post.
Firstly, I cemented the two end posts and then I re-strung a string line between those posts to use as a guide so I could ensure I got the rest of the posts as straight in line as possible. Not every post ended up perfectly in line, however, a few posts a few inches out is here nor there for just a chicken fence…
So the sequence to cementing a post into the ground went: Post in first – small amount of water – half bag of rapid set – ensure the post is level (spirit level) – pour the rest of the postcrete into the hole evenly – add rest of the water – recheck post level – done and move to the next post.
Step 4 – Filling the trench with rubble rock

Filling shallow trench with rubble rock (image above)
When I was brainstorming what materials to use to stop dogs from digging under my fence I pondered lots of different options like: a thick mesh dug down a foot or two; a mesh skirt on top of the ground coming out from the bottom of the fence (I have this method on my pen); an underground concrete barrier the whole way around; etc, but for cost and labour purposes I came up with the idea of using rubble rock.
Rubble rock is what builders use on building sites as foundation material, or as a fill on boggy worksites to enable stable footing for trucks to drive over etc. The rocks are different sizes, jagged, and heavy so difficult for a dog to dig out or through. Also, rubble rock is cheap at $38 a trailer load and it spreads a long way – I got about 50 metres of trench coverage out of a trailer load of rubble rock.
For extra strength I decided to trial using rapid set concrete as a way to bind the rocks together and make them even harder to move and this idea worked really well! The rocks would be laid down first and then the cement powder poured over the top at about ½ bag or so of cement mix between each post. Then a small hand brush would be used to brush the cement into the cracks before spraying or pouring a small amount of water over the rocks to set the cement – this worked a treat!
Nevertheless, I decided to give the cementing of the rubble rock trench a miss because it was obvious with my type of soil that overtime the rocks would set themselves into the ground and grass would eventually grow through making the rock trench hard enough anyway. But, if I was in softer soil I probably would have cemented the rocks in the whole way around.
The other very important point or lesson learnt was when to fill the trench – is it best done before putting on the wire or after? Initially, I filled the trench for my back fence line with rubble rock before installing the wire mesh because without the wire it was easier to mauver the wheelbarrow and lay the rocks without the wire in the way. However, later I realised it was better to place the wire on first because then the wire could be fixed down into the trench slightly below ground level and subsequently when the rocks were poured into the trench it covered the bottom of the wire mesh making it even harder for a dog to dig or try to squeeze under.
So for the rest of the sides I installed the wire first and then backfilled the trench with rubble rock.
Step 5 – Tacking the wire or dog mesh fencing onto the posts and installing gate.

When it comes to installing the wire mesh fence one thing to remember is the posts need to be set which means leaving the concrete dry for at least 24 hours (or even 72 hours for max strength).
Also, because the wire mesh needs to be strained tight it’s a good idea to brace the corner posts particularly the ones under the initial pulling pressure so they don’t pull or lean over.
I did this by using a 1.8 metre long split pine log secured to the post with some galvanised nails and held into place with a 40 cm picket hammered into the ground on a slight angle.

Then, I secured the wire mesh onto one post and unravelled the roll of wire all the way down the fence line until I got to the last post. It’s important to note that a large roll of wire is very heavy (especially in 100 m lengths) so to do my longest length of fence which was my back fence line (80 m) I used a trolley to safely move the roll.
For the rest of my sides, I pre-cut the wire mesh to size so I wouldn’t have so much wire to roll out and this made the job easier.
Now back to straining the wire to get it tight. For the fence to look good and moreover be tight enough to prevent dogs from simply pushing under the fence it needs to be pulled tight between the posts – this cannot be achieved by human strength. A wire dog mesh is made up of many strands of wire therefore pulling on the top strand or bottom won’t work either so I found the best way was to use a hand winch (or you could use a vehicle winch).
Once I had rolled out the wire to the corresponding side I then extended past the last post by about 1 metre. This gave me room to cut the mesh and tie the loose end off to a half log or free post. Then, I used my hand winch to pull on the free log which gave an even pull on the mesh through each strand until it was tight enough.

Using hand winch to pull fence taught you can see the strap attached to a split log which has been wired onto the mesh evenly (image above)

A photo of my hand winch (a very handy piece of kit) – image above
DO NOT OVERTIGHTEN – the wire mesh is tight enough when you cannot bend the wire with your fingers there is no need to super tighten the mesh or you will just break something.
Once the wire mesh is tight enough then start from the far end and tack the mesh onto the posts with “U” nails on each run down each post.
When the wire mesh is tacked onto the last post loosen off the tension from the winch, remove the half log or free post and tie-off the mesh to the post and then restart the process for the next side.

Large galvanised "U" nails to tack each run onto the posts (inage above)
Gate
The final thing to do is put the gate on. I ensured I left a space wide enough for a vehicle to be driven through and then I measured the distance between the posts and retro fitted the gate by getting it made to size (1.5 m high x 2.6 m wide). You could size the gate first and then place the posts the correct distance apart ensuring you allow space for the hinges.
My posts ended up being too narrow to fit a large hinge so I attached another piece of wood to the post at the top and bottom hinge points to make it wide enough – this worked perfectly. Of course, you could use larger posts for the gate or other important points like corner posts if you want.
To keep the dog proof integrity of the fence line, I also dug a trench under the gate and filled it with rubble rock so it could not be dug under.
You may wish to install more than just one gate and have other access gates just remember the old saying, "more gates means more chance of one being left open."

Galvanised gate for my chicken/ducks free-range dog free area (image above)
Materials Used
The amount of materials used will naturally differ between sites and projects. I used extra materials (like posts) because I also built a retaining wall as part of the fence to incorporate a raised picnic area and viewing platform overlooing "Chicken Park."
I cemented every post whereas others may decide to only cement the corner posts and gate. Also, I could have spaced my posts out further apart to save costs but I decided to make my fence as tough as possible and the shorter the distance between posts means a stronger overall fence.

Retaining wall picnic and view area of "chicken park" (image above)

Closer look at the retaining wall made from 3 m pine sleepers attached to the fencing posts (image above)

Before shot (image above)

Reverse angle of retaining wall (image above)
Here are the marerials I used to build my fence (not including sleepers used for the retaining wall):
Dog mesh (200m) – 2.5 mil x 145 cm x 100 m for $215 (needed exactly 2 x rolls) = $430
Posts (57) – $10.50 each post @ 57 (I used extra posts as I also incorporated a retaining wall into the fence) = $598.5
Post hole digger hire = $90
Postcrete (57) – (Rapid set cement bags 20 kg) for posts @ $6.90 each = $393.30
Galvanised gate – 2.6 metres wide = $98
Gate kit – Hinges and latch $30
Rubble rock – Used for the trench anti dog dig 4 x trailer loads @ $38 each = $152
Split logs – Used to brace corner posts x 5 @ $6.50 = $32.50
Star pickets – 40 cm high used to hold foot of post brace x 5 @ $5.00 = $25
“U” nails (gal) – To secure the mesh to the posts x 2 packets @ $4.50 = $9
3 inch nails – To secure split logs (corner post braces) x 1 packet @ $3.50 = $3.50
Marker paint – To mark out the boundary line 2 x cans @ $6 = $12
Total cost for 200 m fence line to secure chicken free-ranging area = $1631.80
Conclusion
I have a little automatic chicken door which I will be installing on my pen soon. It will open at about 9 am every morning so the birds can let themselves out and safely free-range all day then the door will close on dark after the hens have put themselves to bed.
The fact that my chickens and ducks can safely free-range without my constant supervision is a real comfort and I can leave my property without rounding up the birds and putting them back in their pen with the confidence in knowing they’ll be fine in their dog proof free-ranging paddock whilst I’m out.
If you have any questions I’d prefer to chat on our forum Self Sufficient Culture and I’ve created a thread especially for this fence so join up. A subject like this is difficult to cover fully in an article but is easy to discuss in a forum to nut out any querky situations unique to other people's properties. Also, if you have your own ideas or stories about protecting your chickens/poultry from dogs, foxes, or predators it'd be nice to hear them.
Mark Valencia – Editor SSM
Look, and see the Earth through her eyes…
P.S Here's a video I made about building the fence.