Gardens never stay still, do they? They’re always changing-plants grow, die, and multiply. The seasons change, and with that, the weather. You could say they are dynamic.
But did you know there’s an actual thing called dynamic gardening? Yes, really!
And it’s more than just having a garden that changes naturally- it’s an authentic gardening method.
Dynamic gardening is where you have an ongoing plan rather than a set plan. You fit in with the constantly changing and evolving nature of your garden, so you’re working with nature rather than against it. Plants go in and come out as needed, so that the garden is continually changing and diversifying. Soil amendments and mulching happen as and when required. Seed sowing can be by accident or design. Mulching, fertilising and mowing are done as easily as possible, and in such a way that the harvests are improved and the garden benefits overall.
In practice the dynamic gardening method works brilliantly for the lazy gardener like me. I do things progressively- plant and re-plant as and when needed, I save seed by letting the plants do it for me, I chop & drop….I mulch, fertilise and mow as easily as possible.
Seed Saving & Plant Propagation
I love saving seed and I do it all the time. Saving your own seed means you don’t need to buy that seed again, but also that you benefit from a continuous supply of the plants you love with no extra work. I let my favourites drop their seed from where they stand, and the new plants grow from where ever the seeds land. So you can imagine that my garden beds are quite untidy at times, with some plants very tall, dropped bits everywhere, etc. As the plants either fall over or I pull them out, they create little spaces that I cultivate and refresh. There is never more than a square foot of bare or uncultivated space in any of my garden beds.
My garden beds are always dynamic and done progressively. For example, as one or two plants come out, I refresh that bit of soil, then put two more fresh seedlings in. With this method I can change them around as and when I like, which allows me to easily change the variety & density of plants, and thus the overall look of the garden. So if you’re older, lazy or less able, this can work really well for you. Not to mention, it allows for progressive flowering and fruiting- there’s nothing worse than being overwhelmed by a glut!
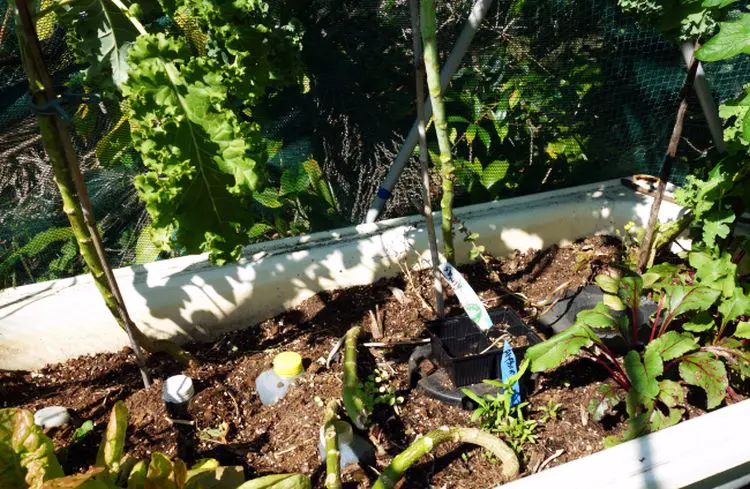
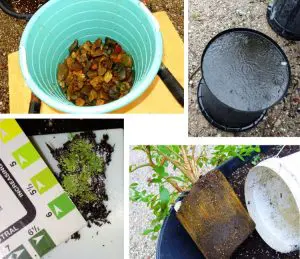
The photo above shows the dynamic gardening method in practice. You can see there is a fair amount of vacant space, available for more plantings.
To the front right there are beetroot leaves which I have picked heavily, but are still producing well. To the front left corner you can just see the leaves of some red lettuces which are too young to pick yet.
Kale is visible on the far right hand side: I have picked plenty but there’s still lots of life in it yet. There are two types of flower seedlings next to the beetroot which will be planted in another bed soon. The two tall stems at the back are sprouting broccoli which have been chewed by possums. Leaving the eaten stems works to deter possums- apparently it’s a message to them that there is no more food left, so they move on. In time I’ll pull out those stems and top up the soil in that spot.
The milk bottles and upturned plant pots in the bed simply fill root space. I do this because that space is not needed by the current plants & it saves me money buying soil. I explained before in my geodesic dome article how I do this.
The growing medium or soil is replaced dynamically. I move (and sometimes remove) 1 or 2 milk bottles at a time and replace them with fresh soil. The growing medium I remove will be scattered around fruit trees and other garden beds. In this way, all the soil from this tub will be replaced progressively, over approx. 18 months.

Chop & Drop
The ‘chop and drop’ method creates an abundant microbiome for both plants and insects in the garden. Allowing leaves to rot down under plants and trees provides the building blocks that soil bacteria and fungi need to do their job, i.e. turning vegetable/organic matter into humus and plant food. What you’re effectively doing is on-site composting: for example, when the leaves of a tree are placed right under the canopy, the remaining nutrients in those leaves become available to the tree again, so if a tree has specific needs in trace elements, for example, they will be right there. In this way, deciduous plants such as grape vines are able to recycle the one set of trace elements year after year, simply by dropping their leaves. Those leaves then sit all around the base where they decompose into the top layer of soil, ready to be consumed once again.
To speed up the chop & drop composting process, you can do two things. You can mow over the dropped leaves and fine material without the catcher on. Mowing prevents leaves being blown away, saves raking and puts the fines into the thatch layer (thatch is a loose, intermingled organic layer of dead and living shoots, stems, and roots that develops between the zone of green vegetation and the soil surface. Thatch build up begins when turf produces organic debris faster than it can be broken down). This makes it easier for earthworms and invertebrates such as slaters to consume that rotting leaf matter. As they come up to the surface at night to eat, they aerate and loosen the soil surface and thus maintain a good soil tilth.
Using a chipper or mulcher is another good way to speed up the breakdown of fallen leaves and small branches. The chipped material is excellent for mulching all plants. A word of caution though: if there is a lot of greenery in the chipped material, you might need to sprinkle a handful of blood and bone (bone meal) through your new mulch. This is because newly-composting material can rob the soil of nitrogen for a while, so may have a negative effect on fast-growing food plants.

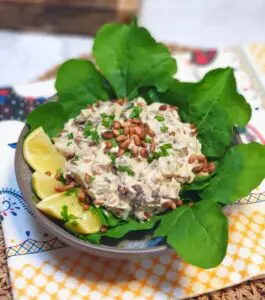
This is a photo of part of my food forest which I call the ‘New Guinea garden’. At the bottom are two brassicas which I have planted progressively. Behind them is a young capsicum, and you can see a tomato tied to the stake. A sugarloaf cabbage sits next to the the tomato, and a cassava cutting has just been planted to its right. The inset photo is the same garden from a different angle. Mature bananas are visible, along with cassava and paw paw (papaya).
Living mulch for this garden is provided by nasturtiums, kang kong (an Asian green) and a weed. On top of all that is a 10cm (4″) layer of fresh horse manure. While it’s usually left to age before using, in this instance I was able to apply it fresh because it was collected while raining. Because it’s already moist, it begins to break down immediately into a quality mulch that binds to the soil and the living mulch under it. It is full of microbiome (community of micro-organisms) which explode into life as soon as they are in a dark, moist protected setting such as this garden.
Fertilisers used in this bed are the mulches, vermicompost, lucerne tea, and chicken manure pellets. Phosphate will be dug into the soil annually, a small section at a time. A foliar spray of trace elements is applied as required.