This is a simple guide about breeding Japanese or coturnix quail in the backyard and basically my assessment of the most relevant information people need to know for breeding new quail stock and practically how I breed my own quails.
I've tried to write this article based on my experiences and incorporate my thought processes when it comes to breeding quail so I hope you enjoy the read and find the information relevant.
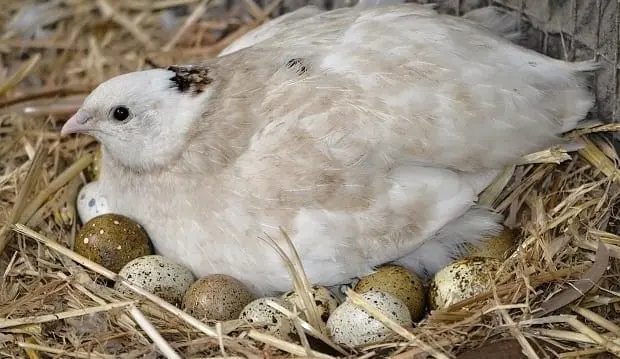
A rare sight of a quail sitting on her nest filled with eggs (image above)
Why breed quail?
Well, quail don’t live very long, usually about 2 ½ years, therefore if you are keeping them as pets or produce it’s in your interest to breed them otherwise you’ll be buying stock every few years and that can be expensive. An average price for an adult quail is $10 but you can pay more for larger specialist breeds like Jumbo and Colossal quail.
The bottom line is it’s cheaper to have your own quail breeding stock and besides that there’s no other poultry species that is easier than or as cute as quail for breeding purposes. Children and adults are often mesmerised by these tiny quail chicks hatching out then running around – it’s a great experience raising Japanese quail from egg to adult.
Breeding stock
However, to breed quail you’ll need to start with a good base and this means good breeding stock. Quail can inbreed easily and this will lead to high percentages of deformities or sterile birds if left to happen. It’s best to start with parents from different bloodlines and most certainly don’t breed brothers and sisters together.
Marking different bloodlines (usually by a leg ring) can help in knowing the history of your quail stock and it’s not rocket science either just common sense to ensure there’s separation and broods don’t interbreed.
Often quail breeders will have breeding pen/s or cage/s and separate their breeding stock from their produce stock and then refresh their breeders about every 12 months. Every few years, I will go and buy some quail from a reputable breeder just to ensure I introduce new blood into my stock
Ratios – The ratios of keeping males to females for breeding purposes is about 1 male to 5 females if you’re keeping them in open pens and 1 male to 2 females in small breeding cages. Males will fight with each other over the girls (especially in small containments) and this can be fatal. They’re also territorial so it’s good practice not to over crowd with too many males otherwise they’ll spend all their energy fighting and not mating!
Egg laying
Coturnix quail are seasonal layers usually only laying through the warmer months when the days are longer as their body clocks are connected to light (daylight). However, quail can be tricked into laying all year by extending daylight hour’s artificially through lighting and many large quail producers do install lighting in their pens. To keep quails laying all year round they’ll need about 16 hours + of light per day.
Laying season – For a backyard breeder (like myself) I have a different outlook and prefer to let my quail go off the lay naturally through winter when daylight hours reduce for these reasons:
- Rest – For a little bird quails lay a lot of eggs and compared to their body weight it’s quite an amazing feat. I believe in letting quails rest their body and by artificially extending laying all it does (besides making more eggs) is shorten the life of the bird and creates undue stress.
- Quality – My belief is that the egg quality is better when collected during the quail’s normal egg producing cycle, and, better quality eggs means a stronger flock of birds.
- Incubation & Brooding – When incubating eggs and brooding chicks a heat source is required to keep them warm and this heat is harder to maintain through winter anyway so I like to do most of my quail production through the warmer months – it saves energy and it’s safer with less stock losses due to cold temperatures.
Collecting eggs – Large quail producers have their breeding stock in cages with roll-out egg trays so when an egg is laid it rolls out of the cage and into a collection point (usually at the front).
Many backyard quail breeders have them in a pen and I think this is a more humane way of breeding but the only problem with housing quail this way is finding the eggs. Quail won’t usually lay in a nest and will generally lay all over the place, therefore, collecting the eggs requires some patience to scan the pen and carefully lift litter to find the eggs. Occasionally, quail will lay in clutches or go to a favourite spot but more often than not the eggs will be scattered all over the place and you’re bound to step on the odd one hidden under some straw.

A large quail pen completely predator proof (like mine) is ideal even if egg hunting is harder (image above)
I usually only collect the eggs once a day but some experts recommend checking and collecting eggs up to 3 times a day. Eggs can be collected and kept for up to a week (7 days) before incubating them together but after that egg virility wains considerably, also it is recommended eggs be stored at about 15 °C, ideally, whilst waiting for incubation. Don’t refrigerate fertile eggs as low temperatures will kill the embryo.
Eggs size and quality is important when collecting for incubation purposes. Ensure all eggs are in good condition with no cracks, excessive dirt, and discard any abnormal sizes like extra large or small.
Incubation
Japanese quail eggs take 17-18 days to hatch. This is an amazing growth rate when you think about it and how a cell can grow into a fully formed bird in just over two weeks is beyond comprehension.
Female quails rarely get broody (sit on eggs) and on the odd occasion when they do sit on a nest it’s even rarer they will be competent enough to actually hatch out a baby chick, and rarer still if that baby chick survives after hatching – having said that, it can happen…
However, my main point is natural incubation is not worth trying unless you get a surrogate mother like a broody chicken and then it could be successful. By far the easiest and best way to incubate quail eggs is by using an incubator.
You don’t have to buy an expensive incubator either, in fact, incubators have come down in price considerably over the past 10 years with the inclusion of cheap Chinese products on the market, which are actually quite good quality. I purchased my second incubator from eBay after my expensive Hovabator incubator eventually died (not that Hovabator don’t make good incubators – they do – it’s just that I found a much cheaper one here on eBay which operates just as good).
Then you can get the large commercial incubators like the GQF Sportsman and they have a front door (looking more like a fridge) with a section to automatically hold chicks until the whole batch has finished hatching. These commercial incubators are really only for breeders who are wanting to produce large quantities of stock to sell but for the average half-serious backyard breeder a standard incubator holding from about 40 – 100 eggs is all that’s required.

My "no brand" egg incubator with digital front panel (image above)
Temperatures and humidity – To incubate and hatch-out quail successfully the incubator needs to maintain a constant temperature of 37.5 °C (100 °F) and have a relative humidity of around 60% or 70% – most modern digital incubators measure both temp and humidity. Humidity is regulated by adding water to a chamber usually on the floor of the incubator and for backyard enthusiasts this can become a little confusing and difficult to get the humidity just right.
Personally, for backyard breeders with small incubators, I wouldn’t stress too much over humidity levels fluctuating a little during the incubation period and just try to do your best. The main points about humidity levels are not to let them get excessively high otherwise the chicks will drown in their shells and also not to let the humidity get really low especially during hatching when a constant humidity at about 70% makes the egg shell easier for the chick to crack and open.
Having said that about humidity, if you find gauging humidity levels too difficult and are having poor hatching results try timing the incubation period during the more humid period of the year and forget about adding water to the incubator or regulating the humidity. This practise is NOT conventional but in my humble opinion it’s more likely poor hatching results (in regards to humidity) is due to too much not too little, or too much opening/closing the incubator stuffing around trying to get the humidity spot on. Truthfully, I’ve seen great hatching results when no water has been used to regulate humidity at all and the incubator is just left alone at the correct operating temp. I stress this approach should only be trialled if you are constantly getting poor hatching results and your egg stock and temps are spot on.
Calibration – Most incubators will need to be calibrated before use to ensure they are actually operating at the temperatures claimed on the digital panel. For this reason, it is prudent to run your incubator at least 24 hours prior to incubating any eggs so that a constant and correct temperature is maintained. Calibration can be done by using an accurate third party thermometer and/or hydrometer to check the operating temperature and relative humidity of the incubator and then comparing it to the display settings, then it’s just a matter of adjusting the incubator accordingly.
Oscillation – When eggs are artificially incubated they need to be turned regularly to prevent the yolk from sticking to the sides. Turning the eggs mimics what would happen in a natural situation where the broody hen would move and turn her eggs. Eggs need to be turned at least three times a day from one side to the other which can be a real pain to do and remember; therefore, I highly recommend buying an automatic egg turner for your incubator. The good news is most incubators these days come with an automatic egg turner already installed – easy.

Quail eggs inside incubator on auto-egg turner (image above)
Place the eggs into the tray pointy side down so the small end is on the bottom and leave the incubator do its job. Try not to open the incubator unless really necessary (like to manually turn eggs if you don’t have an auto turner) and ensure if you do open the incubator that it is closed as soon as possible.
At about 3 or 4 days away from hatching (day 14) the eggs no longer require oscillation so remove the automatic egg turner and lay the eggs evenly spaced on the floor of the incubator ready for hatching.
Candling – At this point, eggs can be candled to see how the eggs are going. Candling is a process whereby the egg is placed on a light source so the inside can be seen through the shell. This can be handy to determine any eggs which have not developed and therefore will not hatch out so they can be discarded early. If bad eggs are left in the incubator they can explode and make a stinky mess!
Hatching
Quail chicks should start hatching out on day 17 but there may be one or two early hatchings several hours before. During the hatching process it’s important to leave the quail chicks hatch themselves out of their shells without intervention. The incubator should be kept closed for the duration of the hatching out and chicks can survive a few days without food or water so don’t be too concerned or eager to remove each hatchling as they emerge.
Furthermore, chicks will hatch wet so it’s best not to handle them until they have at least dried off. If you find not all of the eggs have hatched out over the expected time-frame then it’s possible there may be some late hatchings one or max two days after the expected time.
Late hatchings can be left to hatch out on their own whilst the rest of the chicks can then be transferred to a brooder.
Brooding
After all the eggs have hatched the quail chicks are transferred to a brooder to begin their growing phase, in particular, the development of their adult feathers so they can withstand environmental temperatures on their own without artificial warmth.
Brooders need to be draft free, predator proof, and if made from a cage type material it’s essential there are no gaps greater than 10 mils wide ot herwise tiny quail chicks will squeeze through. Heating can be done with light globes, heat lamps, gas heaters, electric bar heaters, or whatever as long as it emits heat and is positioned so the heat source can’t physically harm the birds through direct contact. There’s a good range of brooder heaters on eBay here.
There are some good purpose built commercial quail brooders on the market but they are quite expensive. For a backyard breeder not requiring a large turnover simple DIY brooders made from boxes, storage containers, cages, can do a competent job and be very cost effective.
Flooring – Ensure the brooder has a good non-slip surface – this is important! A slippery surface can be difficult for young quail to manage and it may be the cause of deformities such as splayed legs (where the hips fail to knit properly and the chick can’t stand because the legs are splayed apart). The same goes for the incubator because as the chicks hatch the egg residue can make the surface slippery so ensure it’s a grid and not made from a smooth slippery material.
Galvanised grid mesh flooring at 10 x 10 mils makes for an excellent surface for a quail brooder. The mesh can be suspended over a litter tray and this method saves cleaning and is way less messy than keeping the quail chicks on a closed floor plus the quail don’t have to be removed regularly to clean the floor because excrement’s and spillage fall through the mesh into the collection tray. Nevertheless, brooding quail on a non-mesh type floor (like a plastic storage container) is completely fine also, just be sure to use some non-stick material on the floor like rubber mating and then some litter on top of that such as straw or sand.
Temperature – It’s recommended the brooding phase starts with a temperature similar to incubation or at least 35 °C and can be reduced by about 3 °C each week for a period of 3 – 4 weeks, possibly less during hot weather and possibly more during cold.
A simple way to know if the heat source is adequate for the chicks is by observing their behaviour. If the chicks are gathered close to the heater and piling up on each other the heat source is too cold so the temperature needs to be increased, and if the quail chicks are scattered to the edges of the brooder or panting for air the heat is too high so it needs to be turned down.
Also, if possible it’s good to have an area in the brooder which is at a lower temperature for those individuals not requiring as much heat to escape and be comfortable. This also helps the quail chicks to wean themselves off artificial heat and be prepared for release into the environment.
Sexing – Until quail are at least 4 – 6 weeks old sexing by sight is very difficult, especially, if the breeds are mixed colours. The common Japanese, coturnix quail are the easiest to tell apart by light coloured spots on the female's breast feathers. The male will not have spots but instead a darker collar and darker breast feathers overall. Adults are much easier to tell apart by inspecting the underside of the birds. Males will have a pronounced genitalia (often with a protruding white foam oozing out – if sexually active), whereas females will have a dark vent.

A male and female common Japanese Quail (image above)
Feed
Generally, quail eat a diet high in protein at around 25% (certainly higher than chickens) so they do best on a purpose made commercial quail feed. If quail feed is not available then any game bird feed for turkeys or ducks will do fine and if a chicken crumble is all you can get then it’s better than nothing although the quail will grow much slower. Try adding some soy meal to chicken crumble in order to increase the protein content.
Quail don’t normally eat kitchen scraps (like chickens) so don’t bother supplementing their feed with bits of lettuce, salad, or bread as they probably won’t eat it. However, quail do like insects and sprouting seed so some quail breeders go through the trouble of breeding maggots or sprouting their own seeds as supplementary feed for their birds.
Breeders – Adult breeder quail can be given a maintenance feed (rather than a grower) and also benefit from some shell grit for added calcium either mixed in with their feed or given in a separate container as a supplement. Obviously, the difference between a maintenance feed and a grower feed is the maintenance being meant for older birds which are kept for laying eggs, and the grower feed is for young quail being bred primarily for slaughter.
Medicated feed (Yes or No) – Quail chicks are often fed a medicated game bird or quail chick starter – it’s medicated to mainly prevent the young birds from contracting Coccidiosis (intestinal parasites affecting some poultry) which can kill. The medicated feed is usually given until brooding is finished and then the birds are fed a grower which is usually not medicated.
I have had good advice from a specialist quail breeder that using medicated feed for quail chicks is unnecessary. This advice was given to the breeder I know by a poultry scientist and other experts who state quail don't suffer from Coccidiosis; therefore, you may decide not to use a medicated feed at all.
You can get non-medicated starter feed for chicks and although I used to think using a non-medicated feed was risky (and see no harm in using a medicated feed as directed to get the chicks off to a good start) I would now recommend trying a non-medicated feed.
Not eating – If you notice newly hatched quail are not eating their feed, it can be because the crumble granules are slightly too big. In this case, use a grinder or blender/food processor and process the starter crumble briefly so the granule size is reduced – the quail chicks should then have no trouble eating the feed. After about a week the quail will be large enough to eat the crumble without any processing.
Feeders and drinkers – Initially, feed and water are supplied in the brooder and because this is a confined space it’s important to consider where to place the containers. For the first week, I place water and feed containers just outside of the heat source so the water and feed can’t get hot but it’s still not too far for the chicks to go. After the first week I position the feeders and drinkers out of the way to the edge of the brooder somewhere and this not only gives more space but it also encourages chicks to leave the heated area and slowly acclimatise to cooler conditions.
Obviously, the numbers (or size) of feeders and drinkers depends on how many quail which is also relative to the size of the brooder. As a guide, allow about 2 cm of feeder space per bird but it should be easy to identify if feed and drinkers are not sufficient by observing behaviour so if the feeders look overcrowded they probably are…
Drowning – Quail chicks are so tiny they can easily fall into the lip of a small chick drinker and drown. Thankfully, there’s a simple trick to prevent the untimely death of any quail chicks from drowning by placing marbles around the drinker lip or in the shallow container so the quails can’t fall in and get stuck and drown or die of hyperthermia.
Release to growing pen
The final stage at 3-4 weeks is releasing the quail chicks from the brooder into their growing pen. All the birds should have most of their adult feathers and it will be obvious they no longer need a heat source.
New quail should integrate into an existing pen with other adult quail without too much problem providing there is enough room and drinkers/feeders. If the new brood is to be housed with breeding stock than identification foot rings can be used to easily distinguish old from new and different blood lines. Also, some quail colours (apart from the original coturnix quail) can be difficult to tell the sexes apart by just appearance so foot rings for males and/or females can be handy.
Adult – At just an amazing 6 weeks old quails are adults, capable of breeding, and laying eggs so the cycle can begin again. If keeping the quail for meat purposes the optimal age for eating is when they are a plump 9 weeks old but we’ve eaten quail up to 12 months old and they still were good eating.
Handy links
Incubators on eBay (where I got mine from)
Brooders – USA online quail store (even if you’re not interested in buying a commercial brooder these are good examples)

Newly hatched quail ready for the brooder (image above)
Conclusion
It may seem like a lot to know when you browse a lengthy article such as this about quail breeding but in reality it’s all pretty easy to do.
Preparation is the key. If all the steps from egg collection through to brooding are ready to go and followed with an element of care and common-sense then hatching out your first batch of quail chicks will go well.
The experience of hatching out quail (or any birds) is truly wondrous and I never tire seeing it (neither do the kids) so if you are leaning towards giving it a go but just aren't sure, I'd say got for it!
Happy to discuss this article on our forum or in the comments area below.
Mark Valencia – Editor SSM
Look, and see the Earth through her eyes…