Keeping chickens isn’t a difficult thing to do but you do have to get some of the fundamentals right and one of those areas is flooring. In particular, the flooring areas within the coop itself and any areas you (or the kids) have to regularly walk over to gather eggs or maintain the pen.
Large chicken pens (like mine) are designed with the chickens welfare in mind. Heaps of space, natural surroundings, lots of natural materials within the pen, and safe from predators. Even so, and just like any animal kept in a controlled area for any length of time, chickens can, and will, make a fair mess of their surroundings.
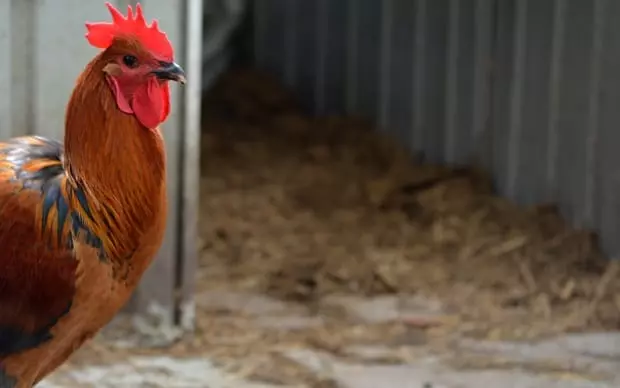
Roosters are a handsome bird (image above) and the paved entrance to the chicken house in background
As we know, chickens scratch dirt and debris all over the place when they look for food; however, not many people know that chickens like to dig (oh yes they do…they love it) and they’ll dig a hole a foot deep if the soil in their pen is appropriate. These actions can make a heck of a mes s in the pen especially in bad weather.
Also, chickens poop constantly and although in a large pen it’s not necessary to clean up these poops daily, in the right conditions (or in wet weather) the ground in a chicken pen can become a real messy slip hazard because the poop creates a slippery film on the ground. It doesn’t take much chicken poop to create a slip hazard either and believe me, going AOT in a chicken pen with a basket of freshly gathered eggs (in the rain) is one of the worst sensations a person could feel – a human omelet is a close description.
Therefore, how do we make the floor of our chicken pens safer and better for us and our chickens? By creating a paved path to commonly visited places within the pen or paved area/s for where the chickens roost and lay.
Now before gettin g into paving and what materials to use, some may wonder why not just have a concrete slab? Well, I guess concrete for the nesting or roosting area within your chicken pen is a good idea; however, keeping your chickens on a total concrete slab is definitely a poor option. Chickens need to scratch, dust, and sit in dirt to stay happy so we shouldn’t concrete the whole chicken pen.
Anyway, concrete is more expensive than paving (especially if you need to get a contractor to lay the slab for you) and paving is much easier to DIY for people who have limited building experience.
The type of paving I’m talking about isn’t complicated either and it just needs to do a job – not look pretty. And because of this, there are many inventive and cost effective materials and ways to do a simple paving job in a chicken pen.
For instance, if the roosting or laying area in your chicken pen is not already concreted then large concrete pavers will do a top job and turn a damp, dirty, mess into a hard standing, easy to clean area.
Large concrete pavers can cover a small area and be operational in minutes and “seconds” (pavers with flaws) can be purchased from landscaping supplies at great prices. Often no other materials are required – just level off the soil, lay the heavy pavers down, and they settle into place. For an even better job, or on hard or boggy ground, a small amount of paving sand and/or drainage gravel will ensure the pavers settle under feet nicely.
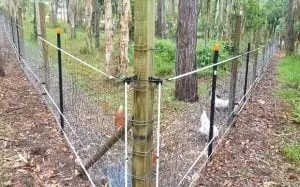
Concrete pavers can also be used to make the pathways to well used areas within the pen, like from the front entrance to the laying boxes or feeders/drinkers. Nevertheless, an even cheaper (and I think better) option is wooden sleepers. I used pine wooden sleepers laid half a pace apart as a stepping path from the front entrance of my chicken pen to the nesting area and it has worked a treat!

Laying my pine sleeper path only took minutes! (image above)
3 metre long pine sleepers (75 mm thick) can be purchased for around $15 each and all I did was cut them into 1 metre lengths = 3 x pavers. The metre wide wooden stepping pavers are surprisingly heavy and stable but they still do need to be secured in place. I used 12 inch, 10 mm diameter, steel spikes made from reo (concrete reinforcement mesh) and hammered them into the ground through a predrilled hole (one mil smaller than the spike diameter so it was a tight fit) in each end of the sleeper. This method held the wooden sleepers in place perfectly and has kept doing so for the last few years no problem.

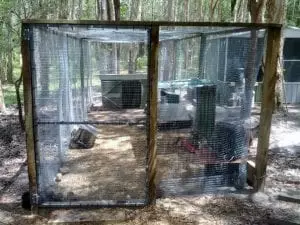
All these materials are quite inexpensive and have stood the test of time (image above)
I should also mention before laying the wooden sleepers down, I rolled out some chicken wire beneath the sleeper pathway and the reason for this was to help stop soil erosion (it works surprisingly well) and to stop the chickens initially scratching the loose earth from around the newly laid sleepers.
The advantages of having wooden stepping pavers for a pathway in my chicken pen are:
-
Cheap – Much cheaper than concrete or concrete pavers.
-
Easy – I had a workable path within a few hours.
-
High – The height of the sleepers ensures the path stays free from water, mud, and debris even in the worst weather.
-
Durable – They will last for many years.

A sleeper path is very useful in heavy rain in the image above water is rushing through the pen but the path is still navigated easily
Finally, we can’t forget mulch. Regularly, throwing mulch around the pen and on the floor of the nesting/roosting areas will help immensely to keep a stable footing and make the whole pen more pleasant for chickens and humans alike. Whether it be a commercial sugarcane mulch, hay, or grass clippings, they are all effective materials for soaking up poops and creating a barrier between a muddy floor and feet.

The floor to the hen house (behind the rooster image above) is thick with sugarcane mulch and helps to mop up poops and also clean mud off feet before they get to the nesting boxes
So, if you have already built or you’re building a large chicken pen, then consider making your pathways to frequented areas within the pen and the nesting/roosting areas hard standing. I guarantee when it’s pouring with rain and it’s your turn to collect the eggs you’ll be 100% glad that you have a good stable pathway to get from the front of your chicken pen to the nesting boxes and back. And, there will be less chance of you turning into a human omelet by slipping over unceremoniously with a basket full of eggs!
If you liked this story then please share it around. Also, we have a comments section below if you want to have your say (you don't even need to enter an email address). For answering questions, my preference is to answer questions and discuss self-sufficiency on our forum Self Sufficient Culture so feel free to join up and start a conversation!
Thanks for reading and thanks for your support.
Mark Valencia Editor SSM
Look, and see the Earth through her eyes…
You might also be interested in reading: Best nesting or laying boxes for chickens