This article was revised on 11 Mar 2015 Keeping poultry, like chickens, ducks, and quail etc is great fun but sometimes we need to control where these animals go for the safety of the animals and for our peace of mind. That's where a good quail/chicken run can become a handy semi or fully permanent tool for keeping your birds away from danger or just away from parts of the property you'd prefer them not to go.
Anyone can do this project and in this article I will explain in 10 easy steps how you can build your own quail/chicken run without needing the skills of a carpenter or builder. I have also made a video on YouTube called How to Build a Quail or Chicken Run and you can see it at the end of this article where it is embeded.
I acknowledge my building skills and design could be better but the aim of this article and the video is to show how a person with limited experience can indeed make a stable, functioning quail or chicken run. I have since realised ways this project could be improved but I can also say with pride that several years later the run is holding together nicely and is doing the exact job intended!
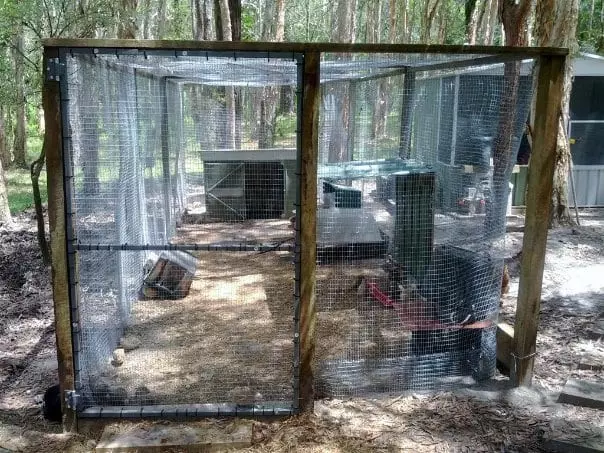
Why build a quail run? Whilst this design can be used for chickens and quail (with the run coming off a chicken coop for example) the purpose for my build was to create a good safe predator proof environment for my quail. I don't like seeing quail kept in small cages and I also believe quail are happier if kept in a pen or run such as this one below. In fact, I know quail grow and perform much better under a pen arrangement rather than cages because I have kept quail both ways for years and a quail run is by far the best way to keep them.
The problem with quail is their size makes them a prime target for predators with owls, hawks, snakes, foxes, dogs, and even rats wanting to eat them which means the pen or run used to house quail must be predator proof!
This quail/chicken run design uses a simple (but strong) wooden framework to hold aviary netting on the inside in a building method that is effective, straight forward and meant for novices.
The size of the particular quail/chicken run you build is up to you – if you want it smaller or larger just scale down/up the design I used but the same building principles still apply.
I have broken this project of building a quail/chicken run into 10 easy steps.
Step 1 – Establish the area you want to put the run (sighting)
An area with dappled shade is optimal but not crucial as you can always add some cover from the sun. Try to keep the pen away from your house as poultry attracts rodents and other animals (like snakes). Also, site the run next to your chicken house so it can be linked (obviously) or if it's for quail and includes housing inside the run then site the run in an area where it is unlikely to get flooded, water logged, or stay wet for long periods.
I sited my quail run here for three reasons:
-
High Ground – It's on the high ground in my poultry area – we get a lot of heavy rain through summer here and higher ground is more suitable in case of unexpected minor flooding.
-
Versatility – If I ever wanted to turn this quail run into a secure chook run all I have to do is build a small extension to the chicken house door and have the chickens enter the run through the side.
-
Convenience – I wanted to keep my poultry housing together for ease of feeding and overall management.
Step 2 – Make a rectangle using a string-line 
For the build, this needs to be done first to mark the size and exact positioning of the run. A string line is the easiest way to square-off the base of your structure thus ensuring the rest of the build will easily fit together. If the base is crooked the whole structure will be doomed from the start and there'll be rails that won't quite reach the posts or posts in the wrong place out of alignment and fixing these issues just adds time to the project and detracts from the overall appearance.
 String lines are easy to do. Just get four pegs and make a rectangle by hammering them into the ground then use string to wrap from one peg to the other. Adjust pegs as necessary to square-off either by eye, or optimally using something square/90 degrees for the corners, or a builders square.
In this case, I used my cut-to-size rail wood to square my corners and the size of my run I decided to make was 2.4 x 7.2 metres. My local hardware has pre-cut wood at 2.4 metres so I made the measurements of my run in 2.4 metre multiples so it would mean less cutting for me.
Step 3 – Locate the post positions
Once your string-line is done you can then locate where each post is to be positioned.
Naturally, there will be a post in each corner and in my case I have four more middle posts (2.4 metres from each corner post).
I used my top railings, which are cut to 2.4m, as a template on the ground to measure accurately where the posts should go. I allowed for a small overlap between the rails to position the post holes ensuring my posts would error on the short side rather than be too far apart when it came to placing the rails on top of the posts.
My final post is my “door post,” which I located 125cm in from the LH corner post. The door post makes part of the door frame so be sure to measure the door post to the size of your door (especially if you have a pre-made door that isn't width flexible).
Step 4 – Dig the holes and cement the posts
Dig post holes in order and opposite each other and square-off

Now that you have located each post and marked the spot it's time to start digging one by one. You could hire a post hole digger but I didn't find digging 9 holes too strenuous. I dug one post hole at a time and then cemented the post before digging the next one. I also dug the post holes in order opposite each other so I could square-off the height. Squaring-off is just a matter of using one of the rails temporarily positioned on top of both posts opposite each other and then placing a spirit-level onto top of that to ensure both posts are level.
Depth
Generally, I dug the holes to a depth of 40cm with a spade width of about 23cm. This gave me two metres of height enabling easy entry and walking around the pen. Also, a 40cm deep hole at about 23cm square was a perfect size for the post and a bag of cement.
Cement
For the corner posts and door frame post, I used two bags of cement so I dug the holes slightly bigger (but not much) than the other holes. The cement I used was purpose made for posting or similar jobs and came in 20kg bags.
Stabilise posts with wood off-cuts
I held each post in position with some wood off-cuts used as stabilisers before pouring in my packet of cement and correct amount of water (water first). A final check the posts were straight and perpendicular with my spirit-level moving into position if needed before the cement set hard was all that was needed.
I didn't have enough scrap wood stabilisers for all my posts but that didn't matter because the rapid-set concrete sets strong enough within 15 minutes to unscrew the stabilisers from the set posts and transfer them to the next one.

Cementing a post is pretty easy and it gives a very strong base for any build (image above)
Allow for sloping ground
The site for my run had a slight slope from right to left so if I made the post holes on the right the same depth as the left my run frame would be higher on one side (right) and my roof would be on a lean. Therefore, to ensure my posts were level with it's opposite I used a spirit-level on top of a rail between the two posts (as per the image) and this meant I needed to dig the right side posts down about 10cm more than the left to make it level. Obviously if you intend to roof the run, then having the posts on one side lower than the other to make a "lean to" so water runs off easily, could be another way to do it…
Don't be too manic if your measurements go astray (a little)
By the way, whilst it is good to get the measurements as exact as possible with this type of project, the beauty is if you do happen to be out a tad it won't matter all that much – it is just a quail/chicken run after all and most errors can be easily fixed or covered up.
Step 5 – Attach the top railings
I positioned my railings on top of the posts the full way around the structure and two across the middle posts to assist the roof netting giving half a post-top each to a railing, which allowed for a few inches of railing to be fixed to the top of the post with a large 5 inch galvanised nail. I pre-drilled the holes first before hammering in the nails just to prevent the hardwood rails from splitting. I placed the middle rails on top of the perimeter rails so as to give a few more inches of height for the roofing mesh.
A couple of my railings were slightly over in measurement (better than under) so I just trimmed the railings where necessary. When I did the initial post location I used the rails as a measure and deliberately ensured the posts were not over spaced as it is easier to shorten a rail than to lengthen one.
Step 6 – Dig-in bottom wire netting
Digging-in the netting really is the “feature” of this design. Due to the size and defencelessness of quail, it's on every predators dinner list so quail kept in a run or pen need to be protected extremely well. Even rats will attack and kill quail so it's important the wire netting is rodent proof and every conceivable gap closed off.
By the book, rats can apparently dig down up to a metre deep; however, I rarely see a rat hole deeper than a few inches and the borrows I see are usually helped by a natural hole like a root at the base of a large tree. Regardless, I allow at least 12 inches or about 30/40cm for my wire trenches and this seems to be suffice.
Of course, if you have other larger predators in your part of the world then you may need to dig down further or use another method but generally this  method I've shown deters most of the baddies.
For this quail/chicken run, I used heavy gauge galvanised aviary netting (90cm wide) and bent it over to make it double strength against predators and rusting.
Place the two open ends into the trench and have the folded end uppermost as this makes it easier to attach the middle wire mesh for the sides. Also, the open end at the bottom acts as a further deterrent for anything trying to dig under as it just makes the dig harder for them to navigate.
Dig the trench around each post (on the inside) and avoid hoeing through the concrete as it doesn't matter that the mesh is several inches away from the base of the posts in some cases.
Step 7 – Attach the wire netting to sides
Size of width
Attaching the wire netting/mesh is pretty straight forward; however, it's not the fastest job especially if you need to join a few widths together to make the height of the run. If I were to use only one width for my sides to save joining time I needed a wire mesh 200cm wide and I couldn’t find that size at my local hardware.
In my case, to make the top rail I needed a further two widths of 90cm mesh.

The first width attaches to the trench mesh (already done in step 6) and I started the roll of wire at the first corner post at the door tying it to the post with a zip-tie (you could use wire, or string) then I unravelled the wire all the way around the inside of the run until I got back to the other door post.
Attaching middle mesh

Then, starting from the corner again I joined the middle mesh onto the trench mesh with wire clips at about 2 inch intervals. Yes, this does take quite awhile to do but it's worth it in the end. As you make your way around the run joining the mesh together it'll seem to be too far from the posts but once you start joining the next width you'll see it will flex out enough to reach the corner posts towards the top (you will have a gap between the mesh and the corner posts most of the way).
Attaching top mesh
When it comes time to attach the second width of mesh to the sides hold one corner with a zip-tie (again) unravel and at stages around the run loosely hold the mesh to the top railings with more zip-ties and this will help to hold the mesh in place whilst you hammer-in the galvanised staples.
Start again at the corner door post and attach the second width of mesh to the inside of the top railings all the way around hammering-in staples at about 4 inch intervals . Then, go ahead and attach the two widths together with clips. You will likely find the two widths overlapping by several inches in areas so just use the clips generously ensuring a neat finish without any gaps large enough for a rodent to squeeze through.
Staple to posts
Once the side mesh widths are joined together then push the mesh against the post and secure with more staples. The side posts will be easy to attach the mesh to but you may have to use a little pressure at the top of the corner posts to stretch the mesh and secure it so it has a taught and neat finish. Remember, most (especially the bottom) of the corner posts will be free of mesh and have a gap several inches wide – this is normal for the design.
Bows in mesh
If your mesh bows-out in places (which can happen with thick gauge wire mesh) and inhibits the build drastically, just cut a split in the mesh to relieve the pressure and make it easier to manage.  Then “sow” the cut with wire clips overlapping the mesh on itself.
Step 8 – Attach the wire netting to roof
 Attaching the wire netting to the roof is much the same as the sides and it's just a matter of starting from one end and working to the other. I went across the run in small widths (instead of the full length) as it gave me better control to staple each width across to the rails. Overlapping each width slightly makes it better for joining to each other with clips and I tended to get a few widths stapled on before moving inside and clipping each width together.
Step 9 – Door
By the time you get to the door it should be the last obvious gap left in your quail/chicken run. For the base of the door frame I used a post (same type as the run posts) cut to size and squared-off giving me a complete rectangle door space.
The door I used for this quail/chicken run was a flat-pack hollow steel frame complete with hinges. This door was expandable up to 140cm wide and 190cm high so all I had to remember was to ensure my door space for the run wasn't over these measurements.
I cheated with the door installation and instead of measuring the door space exactly and making the frame on the ground, I fixed the door hinges to the post (with one screw initially) and ensured the hinges were square. Then, I assembled the steel door frame piece by piece expanding it out until I filled the door space – it worked a treat and I didn't need to measure anything.
Once the door is on you can use some scrap wood or paling on the inside of the door posts as a “stop” for the door (assuming you have hinged the door to open outwards, which is recommended). To fill the steel door frame, I just used some scrap wire mesh and I attached the mesh to the steel door frame with zip-ties with a view to pop rivet it on later.
Also, at this stage there will still be gaps in the wire between the door space/frame and the wire mesh. Fold the mesh into the door frame and secure with staples to complete the wiring; you may need to cut the wire in places (like the bottom corners of the door frame) to make the wire mesh bend easier into the frame.
Finally, check for any holes in the mesh around the door frame and patch if required then go over the wiring job again checking for any holes larger than 2 inches wide and 1 inch thick where a rodent may fit.
Step 10 – Prepare the run and add the quail
If you are using this run for Quail then housing and food stations can all be contained within the run. Quail are small birds that like small poky little places to hide and play so housing can be as elaborate as a small purpose built hutch or as simple as an over-turned plastic container.
I like to recycle so I am currently using an old colorbond cat cage, plastic dog kennel, milk crate, and plastic box for housing in my quail run. Some straw or sugar cane mulch on the floor of the run is a good idea to help neutralise poop and the extra litter will make the quails burrow and scratch with glee.
For food stations, I have two areas in my 7.2m long run covered from rain with feeders that allow beaks but no feet so they can't get in and scratch the food everywhere. I have an old galvanised chicken feeder where I sometime place scraps like lettuce and bread. There are two drinkers also, one automatic drinker using several nipples attached to irrigation piping flowing from a 20 litre container, and one other standard poultry drinker holding about 2 litres.
For a quail run this size I could probably keep a hundred birds easy enough; although, I prefer not to house more than about 30 as I like them to have plenty of space and I'm sure they do to.
On the outside of the quail run, I have placed wooden sleepers on one side (the upper slope side) to stop or slow the flow of water through the run in heavy rain. Naturally. I have left the other side open to allow water to drain through the quail run easily.
With a quail run like this one you could easily improve the structure and add overhead protection from rain and wind or even secure a tarp at one end in particularly bad weather.
At the end of the day, a solid built structure like this one gives more flexibility then one done by half and the professional look and finish is even sweeter when you don't need to be a professional to do it – just patience and time.
Equipment I Used to Make the Quail/Chicken Run
Below is a list of equipment I used to build the quail run:
-
Hammer;
-
Electric drill;
-
Saw (hand and electric trimmer);
-
Spade;
-
Pick/hoe;
-
crowbar (handy for digging the post holes);
-
Long nosed pliers (for wiring and crimping); and
-
Tin snips (for cutting wire).
Materials Used to Make My Quail/Chicken Run (with prices)
Below are the materials I used to build my 2.4 x 7.2 metre quail run:
-
Posts – 100 x 75 x 2400 mils (Qty 9) @ $11.90 each = $107.10;
-
Fencing Rails – 75 x 50 x 2400 mils (Qty 10) @ $5.40 each = $54.00 ;
-
Various wood off cuts for door base, frame, and post stabilisers (small amount) = $10.00;
-
Wire mesh (aviary) 1.47 mil guage and 900 mil wide (90 metres) = $360.00;
-
Wire netting clips 3 x packets containing 500 clips = $16.50;
-
Galvanised staples small “U” shape 2 mil guage (Qty 700) = $6.50;
-
Door hollow steel easy assemble kit x 1 = $47.00; and
-
Rapid set concrete 20 kg bags (Qty 14) @ $7.60 each = $106.40.
-
Galvanised nails 5 inch (large) (Qty 20) = $5.00
-
Wood screws 40 mil (enough to attach one each for the stabilisers to the posts) = $2.00
Some zip-ties (cost negligible)
Overall cost was $714.50, which isn't too bad for a large DIY project like this; considering, buying a run this size pre-made or employing a professional to build one would cost a few thousand or more, at least.
Conclusion

I enjoyed building this quail/chicken run, although, it did take me four days to do it so a double weekender set aside is advisable. The extra work is worth every bit in the end as the strong build lets you comfortably keep your flock knowing they're safe and happy.
I have since placed a roof over the pen you can see how I did it in the "lessons learnt" article.

In my opinion, if you have a choice, housing quail in a run is better than cages even though quail do fine in cages they definitely like an open run/pen area more. I have also found my workload in caring for the quail is surprisingly easier by using one large run rather than several cages – it's less fiddly, easier to maintain, clean, and feed. Having said that, I now have to go searching for the eggs but that's hardly a hindrance – just get the kids to do it.

If you have any questions about building this quail/chicken run feel free to use comments section below or become a member and post a question in the forum – it's free.