Farming worms at home for the benefit of the garden is so fun and easy you can even get the kids involved. Worm castings are used as a fertiliser & provide an enormous nutrition boost to soils. While there are plenty of worm farms available to buy, you can make your own on the cheap and recycle food scraps plus other materials at the same time- it’s a win-win!
Worm farms, technically called vermicompost systems, are an ideal alternative to compost bays if you have limited space- it’s like composting on a small scale. You can farm worms almost anywhere in a cool shady position; on a patio, in a garage, in your backyard or courtyard.
Just like traditional composting, turning your food scraps into worm juice & worm castings can reduce your carbon footprint. Binning your food waste (.e. sending it to landfill) means it will break down anaerobically. This results in methane emissions, which are super-bad for the environment. Recycling your scraps through a vermiculture system can prevent up too 800 kg (1700 pounds) of carbon emissions per household per year.
Worm farms give 2 products that benefit your garden: castings and leachate, which is sometimes mistakenly called worm juice. Leachate is produced when you water your worm farm (see last pic). It is the brown liquid that comes out from the drainage hose near the bottom of your worm farm. When diluted 1:2 in water and used within 3 days, it can be poured on to established trees and compost heaps.

Worms excrete castings (aka poop) after they have fed on the bacteria produced by the rotting food you have added to your worm farm. Worm castings (vermicast) are a rich fertiliser that contain millions of beneficial bacteria and organisms which are vital to soil health. You can spread worm castings straight over your garden soil or use them to make a liquid fertiliser know as worm juice or worm tea.
How to Make a Worm Farm
Assemble your materials.
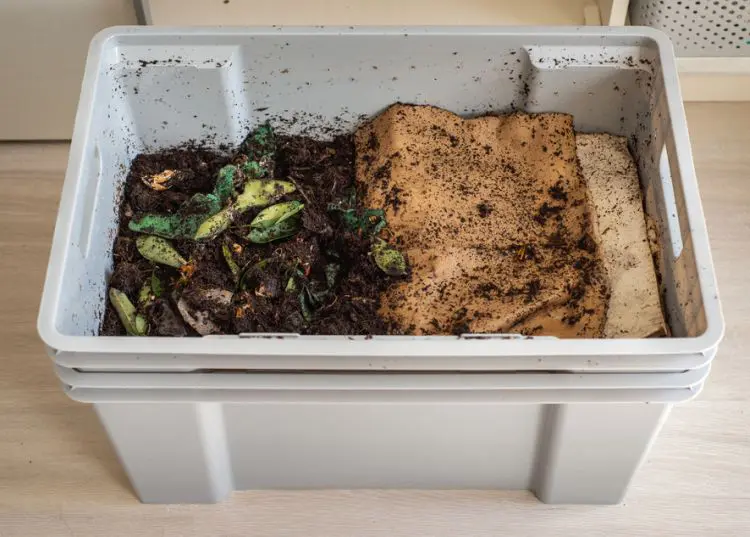
- Polystyrene fruit boxes are everywhere, so you might be able to ask at a local fruit shop for them. They are well-suited for the purpose because they provide excellent insulation and so keep worms nice & cool. Get yourself one of these plus one lid that fits well. A thick hard plastic storage box (shown above) will also work, but you’ll need to use a drill to make the drainage & aeration holes.
- Garden hose. You’ll also need a short length of this for drainage, about 4″ long.
- Gravel. Any type is fine. This is for drainage at the bottom of the box. You’ll need about 1/3 bucket full.
- Geotextile fabric. This is to line the bottom of the box so the worms don’t fall through. You’ll need enough to line the box plus go up the sides a bit.
- Bedding material. This can be coconut fibre, compost, soil, or a combination of the three.
- Worms. You may be able to source some live worms from a friend with an existing worm farm. If not, they can be purchased in packs of 500 or 1000 from nurseries and hardware stores. Note that compost worms are not the same as earthworms.

Assemble your worm farm. Now it’s time to put it all together!
Take your empty box and carefully cut a round hole about 1 1/2″ above the base. Use the hose to measure the size of the circular hole. Insert the hose through the hole, as shown below.

Line the base of the box with a layer of gravel. This acts as extra drainage & ensures that the worms will never sit in water.
Place your geotextile fabric on top of the gravel. This will prevent the worms falling down into the gravel. If geotextile fabric is unavailable, you can substitute hessian, a wool blanket, thick cotton fabric or even thick shadecloth.

Add a layer of bedding material on top of your fabric. Worms need this bedding material to live in, and it helps keep them cool and moist. You can use compost, soil, coconut fibre soaked in water, or a combination of all three.
Next add the worms. Both live worms or worm eggs will work. Make sure that you have compost worms rather than earthworms- they are not the same. Earthworms will perish in a worm farm environment.

Lastly, cover the worms with a layer of insulation and gently water it in. This keeps the worms cool, moist and dark. Damp straw, sugar cane mulch and lucerne mulch are all good insulation options. Put the lid on the box and make sure it has a few small holes in it for aeration.
Leave your new worm farm to settle for a couple of weeks before adding any food. This gives the worms time to adapt to their new home and build up their population. Place the worm farm in a shady position where it will remain cool. Water your worm farm every two weeks to begin with, and check the moisture level with the back of your hand every couple of days. You want it to be about as wet as a damp sponge.

After a couple of weeks, add some food scraps in small amounts. Just like any large outdoor compost system, don’t add citrus, onion skins, meat and dairy, because they will either attract vermin or fail to break down. Worms will eat their own bodyweight in scraps per day, so be careful not to overfeed them, especially in the beginning when your population is quite low. Obviously worms are very small, so the smaller the food scraps you give them, the easier it is for them to process the food. You can also add things like hair, ripped up paper, eggshells, coffee grounds and aged grass clippings. As with everything in gardening, balance is key, so don’t too much of any one thing at a time.
Your worm farm should never smell bad- if it does, this is a sign that something is wrong. You may have added too much food at once or have it too wet. As a general rule, feed your worms a small amount of food every 2-3 days and keep that ‘damp sponge’ moisture level.
These days every gardener should have a worm farm. Worms turn your food waste into ‘garden gold’ and reduce your carbon footprint. Worm farms are super-easy to make and cost virtually nothing, plus they suit every type and size of garden.