When people mention poultry for backyard suburbia the first bird which comes to mind is the chicken. And why not? I mean, the humble chicken is easy to look after, there’s lots of information out there about keeping chickens, and everyone is familiar with chicken eggs.
However, say the “quail” word and most people have heard about them as a great eating bird in top French restaurants but wouldn’t have a clue about keeping them in the backyard.
This is such a shame, because the real truth about keeping quail is that they are actually easier to keep than chickens. I would go as far to say, people who are considering keeping chickens should first try a few quail as a way to “ease into” the poultry keeping game.
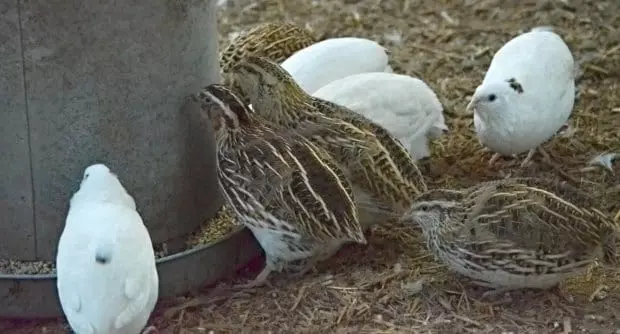
Some Texas A&M (white) and common Jap coturnix quail (image above)
So to help those who have no clue about quail or are considering keeping quail but haven’t heard much about how, I thought I would break it down into 10 easy steps to get a quail from an egg and onto a plate.
10 Steps
Step 1 – Egg
By far the cheapest way to get into quail keeping is to buy them as eggs and incubate. Quails only take 16 to 18 days of incubation before hatching.
15 – 30 fertile quail eggs costs anything from a few dollars to maybe $20 depending on the breeder and if you require postage. Whereas, buying quail chicks at around 3 to 4 weeks old (ready for transportation) can cost anything from $5 – $10 per bird!
You may find the odd breeder selling day old chicks but you need to be pretty organised (with heat source) and not be travelling too far in order to successfully buy quail this way.
Obviously, if purchasing by egg you’ll need an incubator but this will also become useful down the track when breeding your own quail and the cost of incubators are becoming more reasonable by the year. See my incubator video.
 Step 2 – Brooder
A brooder is where the baby quail chicks are placed after hatching usually within 24 hours. It’s like an ICU and mimics the natural heat it would get under a mother hen. The heat is gradually reduced over a 3 – 4 week period as the chicks develop and grow their feathers.
At the hatching stage, you’ll need to be organised already with a brooder either commercially sold and purpose built for quail or home-made. The commercial brooders are pretty good but some do have flaws, however, my main issue with them is the cost – they are way over priced in my opinion.
A home-made brooder is really easy to make out of cheap readily obtainable supplies. A basic brooder can be a simple storage container with a 150 watt light bulb fixed on top for a heat source. A more elaborate brooder could be a large bird cage divided into several sections for different stages of development. See my storage box brooder video.
Naturally the quail chicks will need water and food, which is usually purchased as a game bird chick grower medicated or not depending on your preference. You can use chicken chick grower if your farm supplies doesn’t stock game bird feed, which would be rather odd but does happen.
Step 3 – Housing
After brooding, your quail will need to be housed and there are two ways to house quail: in a cage, or in an enclosed pen. Quail cannot be housed in the open (like chickens) because not only can they actually fly a short distance, they are very vulnerable to predators like: birds of prey, dogs, cats, rats, and snakes. Therefore, wherever quail are kept it must be predator proof. 
Commercial cages are a common way to house quail because they make for a purpose built system whereby the eggs roll out into a collection area and poop falls through a mesh floor onto a tray – it’s all nice and easy. However, it’s also bordering on cruel and commercial quail cages are very expensive.
Homemade quail cages or hutches usually in larger pen-like wall mounted structures are good, cost effective, and also relatively low maintenance. Egg collection isn’t as easy as the commercial cages but reaching into a cage and collecting the eggs isn’t that labour intensive anyway. Homemade quail cages can have a mesh floor or litter (like sand/straw) or both.
Also, pens (fully enclosed and rodent proof) are an excellent way to house quail and are pretty simple to build. See my how to make a quail pen video.
Step 4 – Growing
Quail grow fast and are one of the fastest growing animals on earth from egg to adult in just 6 weeks!
They are best eaten at around 9 – 12 weeks; however, we often eat our quail at 9 – 12 months without any noticeable loss in eating quality.
Quail have a less complicated diet than chickens and if fed on a game bird grower don’t really need any supplementary feed (or grazing). If you are keeping quail mainly for the eggs or breeding and not meat then they can be fed a game bird maintenance type feed instead.

A female quail depicted by the spotted chest (image above)
Step 5 – Care
Apart from a secure enclosure, water, and food, quail don’t require a whole lot of looking after. In fact, they are an extremely hardy domestic bird and rarely suffer from diseases or issues.
In a pen environment where they are allowed to scratch in the dirt it’s prudent to employ a worming strategy. There are many ways and products on the market to effectively worm quail. Personally, I use an exterior product called Ivermectin dabbed on the back of the neck and have found this to work well (please follow manufacturers dosage and instructions). See my poultry worming video.
Step 6 – Slaughter
As unpleasant as it seems, in order to eat quail we need to kill them first. It may comfort some to know quail don’t live very long anyway with 2 years being considered an old bird.
Due to the size of the bird, I akin slaughtering a quail like killing a fish to eat it’s swift and little mess. My method of despatch is by using sharp kitchen shears to remove the head and it’s all over in seconds. See my how to slaughter a quail video.
Step 7 – Processing
Again due to the size, plucking and gutting a quail is no big deal and a pretty simple process. It takes about 5 minutes per bird to process a quail ready for storage or cooking.
All that is required (as far as a set-up goes) is a table/bench, bin with liner, esky or container, a water source, and a small knife. If you are going to pluck your birds, you may want a way to heat a pot of water to make plucking easier.
I prefer to skin my quail rather than pluck because it’s faster and we like our quail prepared this way. All that’s required is the feet and wing tips removed followed by a small cut in the breast to break the skin and then peel the skin completely off in one go. See my how to skin a quail video.
Step 8 – Preparing
Depending on your taste quail can be easily left whole or cut into pieces. As a game bird meat it lends itself well to marinating overnight and we are particularly fond of a piri piri marinate.
Some people comment on the size of quail and wonder if they are worth eating. Let me assure people that quail are very filling and usually one is enough for an adult (it is for me anyway). Therefore, when catering consider 1 x bird per person and that should give plenty of room for seconds.
Step 9 – Cooking
Quail is a game bird and just like duck it is supposed to be cooked until pink and never well done. This is the way the chefs want quail to be done anyway.
For me and my family (friends included) we prefer to break all the culinary rules and cook our quail until it is well done – to coin a phrase of my wife, “burnt and buggered.” We’ve tried the medium rare quail and have found it to be less enjoyable than the slightly overcooked version.
Roasting quail is not too bad (especially wrapped in prosciutto or bacon) but care needs to be taken not to dry it out and there is a difference between over cooking and drying something out!
My favourite ways to cook quail is on an open BBQ whole or cut into pieces and stir-fried in a really hot outdoor wok. Crikey! My mouth is watering writing about it…
Step 10 – Plate
Served with Asian greens and garnished with fresh coriander a neatly assembled quail looks stunning on a plate. The size of the bird gives the dish a real novelty and a feeling of indulgence.
On special occasions like family gatherings, a large serving plate stacked with fried quail pieces is a real crowd pleaser and great finger food.

Conclusion
So there you have it, quail from egg to plate in 10 easy steps!
It’s incredible to me why quail isn’t more popular in people’s backyards but I guess society (mainly Western) is so chicken oriented that other poultry just doesn’t matter to some people and KFQ hasn’t got quite as good of a ring to it. I bet it would taste good though…
Anyway, if you were pondering quail and thinking about keeping them but wasn’t sure then I hope this article helps you decide. Likewise, if you never had a clue about keeping quail well I guess if you have read this far – now you do.
If you would like to know more or just want to chat about quail, we would love to see you on our forum www.selfsufficientculture.com just sign up and start chatting or asking questions we’d love more people to be active on our online self-sufficient community.
Mark Valencia Editor – SSM
Look, and see the Earth through her eyes…