The Kratky growing system is essentially a small, portable hydroponic system for growing veggies that is quick & easy to set up at home. A type of passive or static deep water culture that works without pumps or any electricity, it was named after Bernard Kratky, a researcher from the University of Hawaii, who first proposed the method in 2009 (here’s the original paper he wrote). It is the easiest way to grow green veggies, as it is literally ‘set and forget’.
This is how it works. The plants sit in little cups in the lid of a container. The cups are suspended above a nutrient solution which the roots drop into. As the plants grow and naturally deplete the water level, a gap of moist air forms between the water surface and the base of the plant. This moist air gap has close to 100% humidity, so the roots in this gap become laterally branching “oxygen roots,” and absorb oxygen from the air inside the container.
In this way, the plants are able to breathe despite having some of the roots submerged. The plants will naturally feed on the water and nutrients in the box as they grow, and you won’t have to do anything more unless you see any problems. By the time the water level is fully depleted, the plants should be ready to harvest.

Kratky growing has many benefits and you can establish your own system in 3 easy steps: assemble your materials, prepare your container & nutrient solution, then put your plants in. It is super-low maintenance & space-efficient: really it’s the closest thing you’ll get to ‘set and forget’ in the garden. Once you’ve set up your system there is little else to do- perhaps a periodic pH check & general observation. You won’t need to top up the water or add any more nutrients.
You can set up a kratky growing system anywhere that you have sufficient light. Indoors, outdoors or on a balcony. I have several boxes sitting on a row of tables at the far end of my patio- space that was otherwise unused. It is ideal for renters because its portable and easy to pack up if you need to move house. A kratky system can be as small or large as you want it to be. You can grow one plant in a jar in the kitchen or have a large number of boxes set up outdoors. In fact, kratky is even adaptable enough to be used on a large commercial scale in farm greenhouses.
What can I grow in a kratky system? A variety of plants are suitable for kratky growing, but herbs and leafy greens vegetables are the easiest and work best. Essentially, you should start with small plants that are annuals and don’t bear fruit. Lettuces, kale, spinach, basil, coriander, Asian greens, collards, chives and dill are just a few examples you can try.
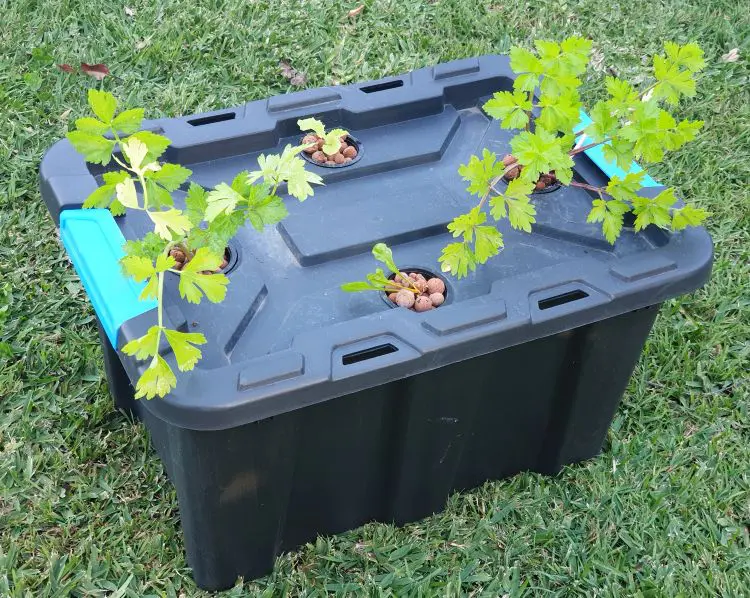
I recently re-set my kratky system, and below is my step-by-step guide. The materials I’ve used are not the only choices; there are definitely others that will work-more on this below. The principles & set-up, however, are standard and scalable to whatever size you want.


Firstly, source a hole saw drill bit and a liquid pH test kit.


You’ll need to source something to hold your plants in place within the cups, i.e. a growing medium. You can use rockwool cubes, perlite, coconut fibre or the aqua clay balls (hydroton) shown above left. I use the clay balls simply because I had them lying around. You’ll also need some hydroponic nutrient. I purchased the above kit from a local hardware store and it contains everything I need for a simple kratky growing system- in fact, this box will last me several years. You can get more fancy with the nutrients if you want to learn about individual ingredients. This is something you may like to do once you have some experience. But for starters a basic kit is easy to use & contains everything you need. This is especially good if you’re new to gardening.


These black plastic ‘mesh cups’ are commonly used in hydroponics and are easily found online. They come in different sizes but the most common one which I’m using here is 2.5″ high. (You might also see them called mesh cups, net cups, hydro cups & hydro baskets).
We all know what plastic storage boxes are- but for kratky growing there are some specifics you need to think about. The lid needs to have enough flat space for drilling a wide hole, because the cups need to sit flush with the lid. I have seen others replace the tub lid with extruded foam, which also works well. The plastic itself needs to be a heavy duty one, or the weight of the water can buckle it (don’t ask me how I know this). Lastly, the box needs to be opaque so that no light gets, plus have a tight-fitting lid so that pests like mosquitoes don’t get in.


Drill holes in the lid of the box. You could drill more than 4 holes, but I’ve found that 4 is best because you need to give the plants space to grow.


Before proceeding any further, make sure that your cups fit the holes that you’ve drilled.


Fill your tub with plain water. You’ll need to get the water level ‘just right’. The water needs to be such that the cups are 1/2 to 2/3 submerged. It is essential to leave some air space at the top because the roots need to access air and water.


The next step is to add the hydroponic nutrients to the water. In the basic hydroponic nutrient kit I am using, there is a ‘part 1’ and a ‘part 2’. Both look like a bag of white powder. I have decanted both parts into separate glass jars for ease of use.


Following the directions on the back of the nutrient kit, measure out the required amount of nutrient with the little scoop provided in the kit. For the half-strength solution I want in this 25 litre container, I needed 3 scoops of part 1. Mix this thoroughly into the water before proceeding to the next step. Note that the nutrients won’t mix in properly if you put them in together: you do need to mix them in one at a time.


Now you’ll do the same thing with part 2. Two scoops of part 2 were necessary and they mixed in quickly. Check the pH with your testing kit just to be on the safe side. The water & nutrient solution is now ready, so put the lid on your box. Next you will prepare the plants.


Choose your seedlings and carefully remove them from their pots. Wash the soil from them gently- I find a bucket of water is gentler than the tap. It’s okay if you can’t quite get all the soil out. You can also grow your seedlings in perlite instead of soil, in which case you wouldn’t need to wash it off.


Feed the roots through the holes in the cups. This can be quite a fiddly job, and you might need to gently dry the roots with a paper towel first. It doesn’t matter if they go through the side holes or the bottom holes. It only matters that the roots reach into the water.


Fill the cups with the aqua clay balls, then sit them in the lid of the box.
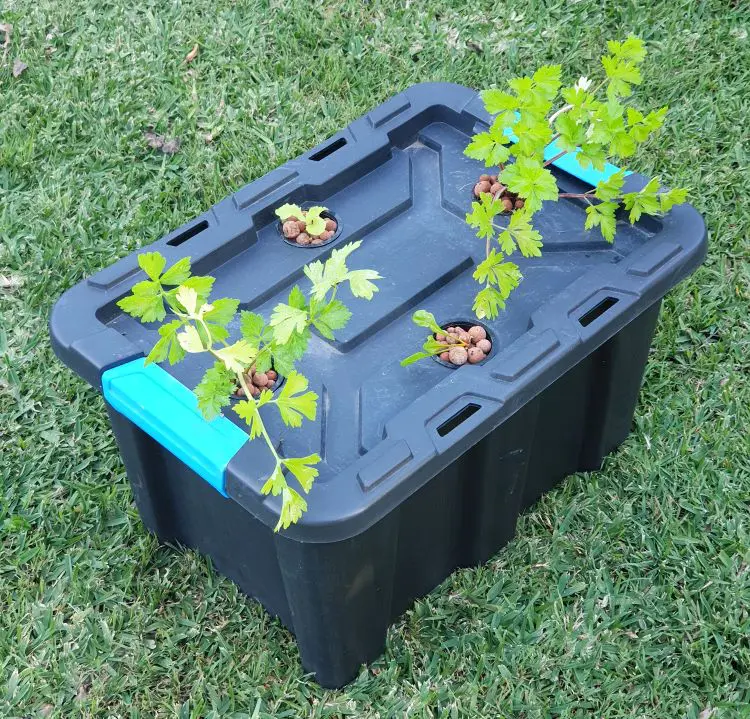
Your kratky system is now complete- all you have to do now is wait for your veggies to grow. If you find you’re getting pest damage, try making one of our DIY garden bed covers!