(This article was reviewed on 30 Mar 2013) I recently wrote about keeping roostersand what they taste like if a person decides to get rid of their rooster and eat him. However, I didn’t elaborate on the slaughtering process and just what steps actually need to be taken to get the chicken from the pen to the table.
Therefore, in this article I am going to detail how “I” slaughter a chicken for the table and what my reasons and feelings are about the whole process. This isn’t the most pleasant subject to cover and people who slaughter and prepare their own produce also have their own ideas about how it should be done. With this in mind, I can only convey my experience and detail the ways which work best for me.
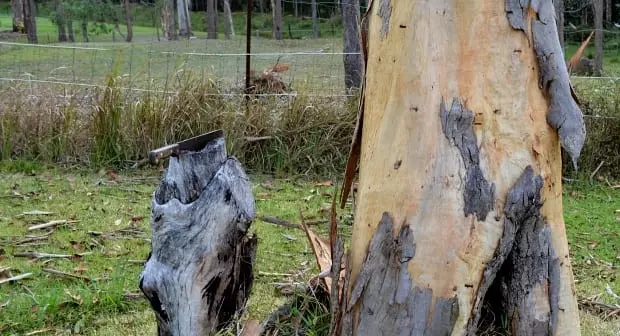
A chopping block can be as simple as an old stump (image above)
My chickens are important to me and my family. As my two boys grow they are becoming more and more interested in our poultry; actually, I thought they would be “over” our chickens by now at ages 6 & 9 but they’re not. My eldest son is keen to learn all about chickens and is fascinated by the level of intelligence our birds show and my youngest has a genuine compassion for them and often asks if he can go down and check on the flock to take them a few scraps, check for eggs, or to ensure they all have a roost for the night.
They say you shouldn’t get too attached to your chickens (if you plan to eat them) because it makes the killing of the birds harder emotionally. I guess this could well be true, but if you care about your animals like we do it is hard not to feel some kind of emotional attachment. Personally, I think it’s dangerous to consider our animals as just “meat” because this emotional separation can lead to inhumane habits forming and animals kept for our convenience rather than for their welfare.

Rooster free-ranging with hens (image above)
That’s why I strive daily to ensure my poultry are kept in the best conditions possible and are practically enjoying themselves in a plentiful, safe, sheltered environment. Our friends and relatives joke regularly about our “Club Med” for chickens and I’m proud they believe we treat our animals so well.
When it does come time to “process” a chicken, I know it has had a good innings. This thought, helps me during the slaughtering of the bird because I need all the justification I can get when killing as it’s the worst part of the whole process (even worse than the gutting) and I never really have gotten used to doing it.
Steps to processing a home-grown chicken

 Step 1 – Preparation
Before catching the bird and stressing it and yourself out, make sure you have the following ready and set:
An implement to kill the chicken – Large knife (my preferred); machete; or axe (whatever is used ensure it is very sharp).
A place to kill the chicken – A chopping block (like an old stump); or a killing cone fixed to a post.
A hot water dip – This can be a large pot on an outdoor burner filled ¾ with water ready to be heated to dip the bird carcass in for easier feather removal.
A processing area – A table or stainless bench (preferably outside); a bin with liner; and access to water tap or hose (if the bench has no sink etc).
Some butchering utensils like a catering scissors and sharp butchering knife.
Isolation – I don’t do this, but some people isolate the chicken the night before slaughter in an isolation pen with only water and no feed. This is supposed to make the gutting of the bird a little easier. I don’t use isolation; therefore, my chickens are treated as normal until the moment just before killing.
Step 2 – The slaughter
Once I have everything ready to go, I then catch my chicken for slaughtering. The method I use for killing the bird is the “killing cone” method; however, I have also used the standard chopping block method and the neck breaking device – all are simple and effective. Here are the two chopping/cutting methods in detail:
 1. Killing cone – This is my usual method and it entails using a cone-shaped vessel fixed to a post where the bird is placed upside down into the cone with its head and neck exposed at the bottom. In this position, the bird is held fast and cannot flap or escape and once the head is removed the bird doesn’t flap uncontrollably causing unnecessary bruising and blood splatter. Also, this method allows both hands to be free to carry out the slaughtering process, which is cutting the head off the chicken with a very sharp large butcher’s knife. Important points to note are:
Knife needs to be very sharp;
Place some straw or sawdust under the cone to soak up the blood.
To remove the head, the neck is cut about 4 inches from the head by pulling the head down with one hand (stretching the neck down) and cutting through the neck with the knife in a firm and fast motion.
For obvious reasons, once you start cutting do not stop until the head is removed.
Don’t leave the chicken lying alive in the cone for too long (hence prior preparation).
2. Chopping block – This method is effective but more difficult than the cone method because one hand is required to secure the bird whilst the other chops. Also, after the head is removed it’s harder to stop the bird from flapping around. I can say I’ve never had a mishap when using the chop method but I have heard of people missing during the chopping, injuring themselves, and having difficulty getting the job done. To make the chopping method efficient the following points should be noted:
Use an implement you can handle – I use an army machete because it is well balanced, has a large cutting area, and I’m familiar with using it. Don’t try and use a tool you can’t easily wield with one hand (like a heavy axe).
Ensure whatever cutting implement you use is very sharp.
Tie the chicken’s feet together for easier handling.
Secure the head by using a simple loop/noose with a piece of string – one end is looped over the chickens head and the other is looped over a nail on the opposite side of chopping block.
Whilst holding the tied feet of the bird, and the string for the head in place, gently pull the chicken back so its neck stretches across the chopping area.
Swiftly, chop the head off by aiming centrally between the chickens shoulders and its head.
Be very careful and safety conscious when doing this method. If you are not confident or unfamiliar with knifes, machetes, or axes, then get some training before conducting a slaughter.
If I have more chickens to slaughter, I do them all one after the other before moving onto the next steps.
Step 3 – Plucking

So, the worst part is over (unless you’re a sadist) and it’s time to pluck your chicken. There are plucking machines available on the market but unless you are running a commercial operation the cost for a machine is ridiculous. For a backyarder, who is only needing to pluck the odd bird doing it by hand isn’t that arduous.
Firstly, to make the plucking job considerably easier the bird needs to be dipped in hot water (almost at boiling – between 60-650C) use a thermometer to check temp and dip the bird for about 2 minutes. I have an outdoor gas burner (wok burner) and this cooking device is excellent for heating up water fast. The dipping process softens (or opens) the point where the quills are fixed to the skin of the chicken, in turn, making the feathers pull-out much easier.
Start with the wings first and remove all the large feathers and plumes from the rear. Then work your way around the bird in whatever way you see fit. Have some running water handy to occasionally wash off any sticky down feathers, which may stick to the bird or your fingers.
Step 4 – Remove the feet
Most people prefer their chickens to have the feet removed before cooking… and I’m definitely one of them.
Simply, locate the knuckle or knee joint and cut the skin below the knuckle exposing the tendons. Cut through the tendons you can see or get to then bend the joint backwards (the wrong way) and this should break the joint exposing the inner tendons enabling the lower leg to be neatly severed.
Step 5 – Gutting
Now that you have a nice clean plucked chook, it’s time to gut the bird. Gutting shouldn’t take too long and although it’s not the nicest job, the processing of the chicken is almost over.
With the chicken on its back and the rear facing you, using a knife or catering scissors make two incisions either side of the parsons nose (oil gland) running parallel to the inside of both legs. The idea is to make a small cavity just wide enough for your hand to fit inside.
 Then, push your hand into the cavity keeping uppermost towards the breast bone and reach in manoeuvring until you get to the top or neck. Once you get to the end, grip down and rake all the guts back in one motion as if you’re cleaning out a blocked pipe (sorry for the mental images but I don’t know how else to describe it).
If you have a hose or a tap handy give the inside of the chicken a wash out and remove any remaining offal; this includes, the chicken’s gullet near the neck of the bird and its lungs which will be attached to the ribcage area. The neck itself can be removed if you require, although, I just cut any excess length off at the top leaving the neck intact. After this, give the carcass another wash out and the gutting is complete.
Step 6 – Store
If you are not going to eat the chicken that day, then, cover and refrigerate overnight and freeze the next day.
If you have more chickens to process, then having an ice bath container to keep the carcasses chilled and away from flies is a good idea whilst each one is done.
Conclusion
To me, when it comes to slaughtering my chickens the most important aspects are ensuring my birds have had a good, happy life and when it comes to slaughtering time, that they have an immediate, painless death. These animals unknowingly serve us for our enjoyment and nourishment; therefore, they deserve our respect, kindness, and care… at all times and at death.
I am happy to discuss this topic further on our forum site at Self Sufficient Culture – I will start a thread in the appropriate section specifically.
Feel free to leave a comment after this article and you don’t even need to supply an email address- if you do it won’t be visible anyway.
As always, thanks for visiting our site.
Mark Valencia Editor – SSM
Look, and see the Earth through her eyes…