What is a Wicking Bed?
A wicking bed is a type of self-watering raised garden bed that is both water-saving and time-efficient. It has a water reservoir at the bottom and growing medium (soil) on the top, which are separated by a layer of fabric. This allows the plant roots to ‘wick’ water up as they require it, so you don’t have to water often. They are great if you have limited water supply, have a busy lifestyle, or have health issues that make hand-watering difficult.
Wicking beds are the most water-efficient garden beds of all. Because the water is stored under the soil, it goes directly and only to the plant roots, eliminating the runoff and evaporation that occurs in standard veggie beds. This means you’ll only need to water every 10-20 days, depending on your climate and the season. Beds are easily refilled with water via a hose or pipe in one corner.

How do They Work?
Essentially, wicking beds work by allowing plants ready access to a store of water held underneath the soil. An airtight, light-proof reservoir of water is held underneath the soil, which the plants draw from as they need it. This is what is called ‘wicking’. A pipe in one corner is used for refilling the reservoir with water as required. The bed is prevented from flooding by the addition of an overflow pipe, which is placed level with the top of the water reservoir. Sound complicated? It really isn’t!
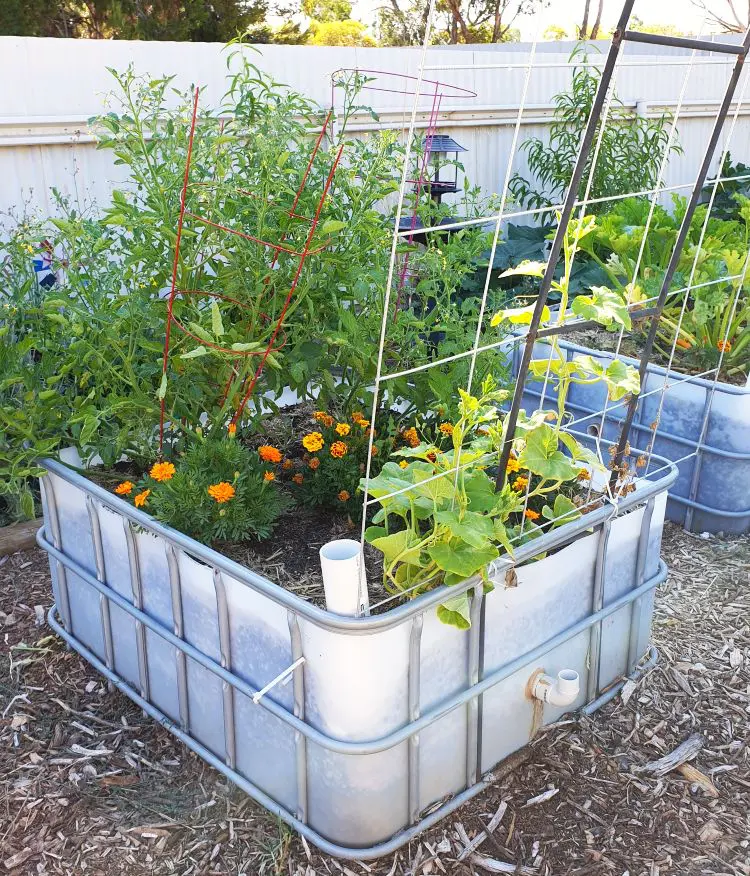
Why Use an IBC?
There are many types of pots, containers or DIY garden beds that will work as wicking beds. For the purposes of this article, we will focus only on IBCs, formally called intermediate bulk containers.
IBCs are are used as bulk liquid storage containers in a wide variety of industrial applications. If you pay attention, you’ll notice they are used for the storage and transport of of things like fruit juice, liquid soap, cleaning liquids, and similar. They are an ideal vessel for repurposing as garden beds due to the strong galvanised steel frame, portability, and non-porous thick plastic liner.
IBCs are a standard size (1000 litres) throughout the world, and are readily available in most western countrie. They make for excellent, strong, long-lasting garden beds that work well for both owners and renters once cut in half. Local online marketplaces such as Facebook are often the best place to look.

How to Turn an IBC Into a Wicking Bed
Here, we’ll show you 2 different ways to turn an IBC (cut in half) into a wicking bed. One with a reservoir full of medium (sand & socked ag pipe), the other with a void reservoir (using bread crates to hold up the soil). There are quite a number of different ways that you can create the reservoir; there is no one ‘correct way’. As long as you have the essential elements in place so as to create functionality, the materials you use can be varied. At Self Sufficient Me, we always advocate using what is affordable, easy to source and easy to work with. This will naturally vary between locales, states, and countries, so don’t be afraid to use materials different from those shown here.
Below are 2 different ways I created & filled my IBC wicking beds, with step-by-step photos and instructions.
Wicking Bed with a Medium-Filled Reservoir


First step, source the IBCs you need. I was able to find ready-made IBCs locally and had them delivered. (I won’t delve into cutting the IBCs here- a quick google will yield plenty of information if you need to do this). Mine came with pre-drilled outlet holes, agricultural pipe neatly cabled-tied around the edge, and pre-made slotted ag pipe for the reservoir (the ag pipe edging isn’t strictly necessary, but is a user-friendly touch that stops clothing catching on potentially rough steel frame edges). I first spray-painted the exterior, because the sun is strong where I live in QLD, and light penetration can contribute to soil anaerobism. I then sourced a pipe fitting that worked with my pre-drilled outlet holes.


Next, I screwed the black plastic pipe into the outlet hole. The inside part of the pipe needs to have some sort of mesh filter over it, so that mosquitoes or any other undesirable bugs can’t get in and breed. I cut a small piece of shadecloth, wrapped it around the pipe, and secured it with a cable tie. I then filled the base of the IBC with a (roughly) 10cm layer of washed river sand, and placed the ag pipe on top. Note that gravel and scoria are commonly used instead of sand, and are perfectly acceptable for use in wicking beds.


While I did have the ag pipe supplied for me, I had to pull it apart and add the sock over the top. If I didn’t do this, the sand would seep into the pipe over time and render it ineffective. If you’re using gravel or scoria to fill the reservoir, you won’t need to sock the pipe. The inlet hose is kept in place loosely while filling the beds. I did this by drilling 2 small holes in the side of the IBC and attaching it with a cable tie.


Another layer of sand went on top of the ag pipe, and I smoothed it out with a piece of timber. Note in the middle of the photo, that the sand is level with the outlet pipe. This is important, otherwise plant roots won’t be able to wick water effectively.
Next, the all-important geotextile fabric is cut & put in place (I bought a large roll because I’m doing a lot of wicking beds & it’s more economical that way, but smaller lengths are readily available too). Note that while the fabric above looks too narrow, it is doubled over. Keeping the soil separated from the water reservoir is extremely important in wicking beds. If the soil seeps down into the reservoir you’ll eventually end up with a slushy, flooded soil bed where plants won’t grow. Geotextile fabric is a strong, non-woven synthetic fabric that is purpose-made for landscaping applications. Not only is it highly effective in separating the growing medium from the water reservoir, but it helps wick water up, too.


Spread the fabric out, pushing it carefully into each corner and up the sides. Once the fabric is in place, the next step is to fill the wicking bed with growing medium. Using hugelkultur principles, I added a layer of leaves, woodchip and perlite, followed by some fresh prunings, biochar, then more leaves and general organic garden debris. Next was a layer of paper. This is partly because I had it lying around, but it has the dual benefits of retaining moisture plus helping the ‘greens’ break down.


I placed a bean teepee here before adding soil. Definitely not a necessary step, but if you’re wanting to add some support structures, it’s easier to get them in place before adding the soil. At this point I tightened the cable tie around the inlet pipe and cut it down to size. Like the outlet pipe, the inlet pipe needs to be covered so that critters can’t get in. You’ll see in the nearest corner of the photos above, I’ve tucked the excess geotextile fabric over it then put a rubber band around it. This will suffice until I devise a more permanent solution.
Wicking beds require a rich soil full of organic matter, so along with soil I had from an old garden bed, I mixed in biochar, worm castings, blood & bone plus some aged cow manure. At the same time, any excess fabric was tucked neatly down the sides. I then topped the bed with a layer of sugar cane mulch and watered it until the outlet pipe overflowed.
Wicking Beds with a Void Reservoir
Instead of using sand, you can create a void reservoir in the base of your wicking bed. This has the advantage of holding more water, which means less frequent watering is required. In order to do this, you’ll need something strong to hold up the soil so the water can sit under it. Here, I’ve used cut-up bread crates. Again, there are a number of materials that could be used here, this is just one idea of many. As long as you have an inlet, an outlet, wicking medium and a water reservoir that is separated from the growing medium, you can use any materials that fit and are strong and won’t rust. Other things you could use include plastic pallets, plant pots and a galvanised fence panel, or cut-up milk crates.


First things first- I painted the exterior, fitted & covered the outlet pipe (details above) and levelled the bed (I also raised it up on a pallet, but that’s just a personal choice). Next, to create a support made from bread crates. You’ll see in pic 3 above that the base of this IBC is moulded in such a way that it is not flat (this is because it is the top half of the IBC- the bottom halves have a flat base). This meant cutting the bread crates so that they sit flat.


Two bread crates left a gap in one corner, so I filled that by cutting a piece out of a milk crate (the pink thing). I then cut holes in two of the crates so that plant pots would fit neatly inside. These plant pots, plus the gaps down the sides, will create wicking points. These are necessary here, because there needs to be a medium through which water is drawn up into the soil. In any wicking bed with a void reservoir, wicking points should be 30cm apart. Once everything fitted and was level, I tied the pieces together with cable ties.


Next, the layer of geotextile was cut and put into place. Note that it needs to be pushed down into the wicking points, including along all sides. The gaps between the bread crates and the sides of the IBC will also act as wicking points.


A levelled layer of sand (the wicking medium) goes down on top of the fabric. It needs to be pushed right down into all the gaps, so that the bed has wicking points throughout. I then added a layer of shadecloth then a layer of sugar cane mulch, both of which will stop the soil from seeping down into the sand.


Lastly, the growing medium. I started with an amount of leaves & general organic debris from around my backyard, followed by a few pieces of cardboard. The cardboard adds carbon, which will help break down the larger organic material, just as it does in a compost bin.


I then placed some fresh prunings on top, followed by some biochar then some tree clippings.


A large bag of potting mix came next. This was to fill the gaps between the tree clippings, which can create air pockets. This is something you definitely don’t want in a wicking bed. Firstly because it’ll make your soil sink quite quickly, but mainly because it hampers the wicking process. To put it more logically, water can’t wick through air.


Lastly, I added the growing medium. Remember that while there is no ‘best soil’ or ‘one correct answer’ when it comes to soil, the soil in any wicking bed needs to be rich and full of organic. Use whatever fits that bill that you have in your backyard and/or have ready access to. Here (LHS pic above), I’ve used some garden soil, 3 bags of commercial compost, blood & bone, trace elements & aged chicken manure. I watered it in, then mulched and watered the bed until the outlet pipe overflowed. The bed is now ready for use.

Using Your Wicking Bed
Using a wicking bed is very easy. There are just a couple of provisos that you’ll need to remember in order to maximise its effectiveness.
The first thing to know is that plants with small or shallow root systems (such as seedlings) won’t initially be able to wick water. They’ll be able to once they’ve been growing for a few weeks, but not at first. This means you’ll need to water the bed as normal until their roots have grown long and strong enough to be able to wick water up from the reservoir below. This is called ‘top-watering’. Once your plants can wick water on their own, you only need fill the reservoir occasionally via the inlet pipe.
Most veggies grow well in wicking beds, especially those in the solanaceae (tomato, potato, eggplant) family, who are very sensitive to consistency of moisture. Others, however, are not so well-suited. These include succulents, shallow-rooted plants, plants with invasive root systems, and plants that require a specific soil pH. Almost all veggies will grow well in wicking beds, saving you time and effort…which is the whole point- better food with less work!