If you're looking to get chickens and wondering what type of feeder is best to buy than before spending a lot of money perhaps try making a chicken feeder yourself – it's easy and could cost you absolutely nothing! In this short article, I'll show you step by step how I made my chicken feeder.
Sometimes the simple and best ideas are right under our noses and this do-it-yourself chicken feeder is one of those revelations – well, in my opinion it is anyway… For many years I've been unhappy with commercial poultry feeders and believe me I have tried nearly all of them! Unfortunately, feed loss is the biggest flaw with most commercial chicken or poultry feeders usually caused by the hens raking out the feed.
A major design flaw in many of these feeders is the gravity feed element. That is, the feeder dispenses feed automatically as the birds eat and this would be fine if the chickens were actually eating the grain or pellets but if a hen learns to rake through the feed without eating it causes more grain to dispense into the feed chamber and then it pours all over the ground. I don't want to dwell too much on the flaws in feeders except to say if you own chickens and have used standard chicken feeders or even most of the designer brand ones you'd know what I mean.
Lost feed to wild birds or rodents is robbing your poultry of their food and you of good money, not only that, feed spilt all over the ground is messy, annoying, and quite frankly NOT supposed to happen. In the end, I got fed up with expensive treadle chicken feeders or those PVC pipe gravity feeders and decided to design my own.
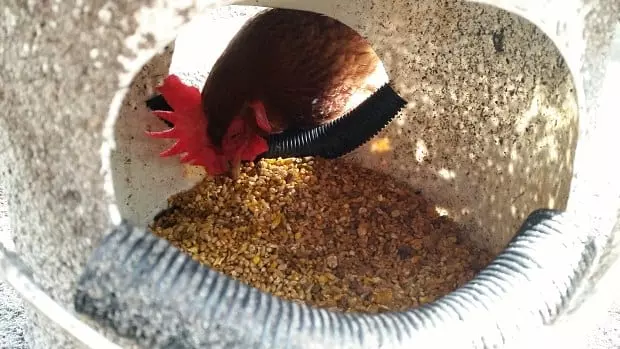
One afternoon whilst in my poultry pen I was testing some fermented feed on my hens – I had the feed in a medium-sized bucket and would scoop a little out to throw it to the flock. Naturally, as curious hens can be one came over to the bucket and proceeded to stretch her neck over the large opening and down to reach the feed. I was surprised at just how far a hen could reach down the bucket and that's when I started thinking about designing a simple bucket or container feeder.

This design is amazingly simple and a picture tells a thousand words but essentially it's any container (like a bin or bucket) with holes in the side for the chickens to poke their heads in to get to the feed. The advantages of this chicken feeder design are:
- Easy to make – If you can measure and use a box cutter then you can make one of these feeders.
- Low cost – Any old bucket, container, or bin can be used to make this poultry feeder.
- Minimal feed spill or loss – Provided the feeder is not overfilled, it will not spill grain or pellets over the edge of the eating chamber. The way the feeder works means even if the hens do rake through the feed to find their favourite grains they can't rake up and out so the feed stays in the container – this a major advantage over a gravity fed feeders where the feed chamber continues to fill until it overflows. However, there is an exception… when this feeder is used for ducks, there's still some mess and feed spill but this is not from the feeder it's by the ducks and the way they eat (they're just messy eaters) and no feeder can stop this behaviour. Overall, this design of poultry feeder is truly no mess.
- Clog free – A big problem with some feeders in particular gravity fed ones is the chute or feed chamber getting clogged due to condensation or wet weather/damp conditions. This feeder will never get clogged!
- Use any feed type – You can use this type of feeder for any feed such as: pellets, grains, fermented wet feed, garden or kitchen scraps.
- Can be used for ducks and other poultry – Most chicken feeders are problematic for ducks making it hard for them to get their bills into the feed chamber and get a good mouth full of feed. If you have a mixed flock this DIY bin feeder is perfect for all types of poultry and allows birds like ducks to scoop out a good bill full of feed.
- All weather – Fitting a storm or rain cover over this feeder is easy enough to do to keep the feed inside the container dry; however, a little moisture accidentally splashed inside the feeder won't hurt.
- Multi-point access – Some trendy and expensive commercial feeders only have one access point (or feed chamber) meaning the birds have to line up to get a go and this can cause fighting or bullying. This feeder design has at least two holes and depending on the size of the container 4 or 5 access points can be created so no hen misses out on their share of feed!
- Rats and mice can't get in – If the container is made from a slippery material like hardened plastic or galvanised steel mice and rats generally won't get in, also, the container can be raised slightly off the ground to make it even harder for rodents to climb up.
- Holds good measure of feed – Initially, you may think the design is wasteful because it only utilises the bottom third of the container (sometimes even less) but you'll be surprised at how much feed this chicken feeder holds. A 20 kg (4 to 5 gallon) bucket holds about 4 or 5 kgs of feed and a 50 litre bin can be safely filled with close to 10 kgs!
- Open to modification – My chicken feeder design is as basic as I could make it – and, it works perfect as is for my needs. Nevertheless, you may like to use this no mess DIY chicken feeder idea as a base to build something better suited to your situation. For example, instead of a round container use a rectangle one, or, how about incorporating a gravity feed element to the container? It's up to you, make it basic like mine or think outside the box and design your own.

How to make this DIY chicken feeder
Now to the making of this feeder and let me assure you it's not rocket science! Besides the container, you will need: a suitable tool (eg box cutter) to cut plastic or metal depending on the material your container is made from; some irrigation pipe (hose, or grey water piping); and something for a lid (if your container doesn't come with one).
Step 1
Find a suitable container. Any bucket will work, small bins are good, large bins work well as long as the base of the container isn't so wide that a hen can't physically reach the centre otherwise feed will be left to stagnate in the middle. As a guide, I wouldn't use a container with a base diametre over 18 inches (about 45 cms) this max size makes it 9 inches ( about 23 cms) to reach the centre, which an average sized hen should easily do.
Step 2
Measure the access points or feed holes. Make a square template out of paper or cardboard 15 x 15 cms (or 6 x 6 inches) and round the corners off at the bottom so it looks more like a "U" shape. Then use this template to mark out where the feeder holes will go by placing it 15 cms (6 inches) up from the base of the container – this is important because my testing found if the base of the hole is any higher than this the hens have a difficult time reaching the bottom of the container. For a small container two access points are enough and on larger containers two or more may be suitable.
Step 3
Cut out the access points or feed holes. Using a box cutter or other cutting tool cut out the marked area – drilling a few starter holes can help make cutting out easier. Trim off any sharp or jagged edges.
Step 4
Fit the comfort rail. Measure out about 6-8 inches of hose (20-25 mm or 1 x inch irrigation hose works well) and cut it lengthways then push it firmly into place over the bottom of the access hole. This comfort rail provides a nice round smooth area for the birds to slide their necks over when they are feeding rather than a sharp thin edge, which could rub and irritate their necks during frequent usage.
Step 5
Find a lid or storm/rain cover. If the container already has a lid then you're ready to go, otherwise, any old lid or piece of tin, wood, etc weighed down with a brick will do!
Step 6
Fill the feeder. When filling the feeder try not to overfill past the base of the access holes otherwise feed will inevitably fall out, obviously… I've found filling the container about an inch from the bottom lip of the comfort rail is perfect. That's it!
Video on how to make a free no mess DIY chicken or duck poultry feeder
This video explains all the above steps to making your own poultry feeder in detail. The first half rambles on about why I decided to design and make my own feeder and the second half demonstrates exactly how to make it.
Conclusion
So there we have it, a no mess no fuss and easy to make chicken feeder. Yes, it probably isn't the "prettiest" feeder design but it works and your hens won't care how it looks anyway.
Feel free to give your thoughts below or even join our forum and comment in the discussion thread right here.
More designs from other people modifying my original feeder
I will update/add more videos to this article if/when they become available…