Here’s a cheap and easy way to build a compost making machine three bays side-by-side utilising recycled wooden pallets to make compost for even the biggest of gardens.
All serious gardeners make their own compost – it’s just a given – because good gardeners know the benefits and nutrients that can be gained from recycling garden “waste.” Besides adding nutrients to the soil compost helps and introduces beneficial animals/organisms into the garden whilst also improving the existing soil structure such as increasing its water and nutrient holding capacity.
There’s simply no point in buying all the fertiliser/soil enhancers required to maintain a garden when at least some or most of it can be made for free as it's expensive to buy these products for a start and also it's a waste of natural resources to throw away compostable garden/kitchen materials.
Much of the green waste we cart away to our refuse centres could be recycled into a valuable garden resource simply by heaping it up in a compost bay as is or for larger stuff shredding it first with a reliable chipper. The broken down compost can then be used as a dug-in plant food and soil enhancer or even a wonderful mulch for fruit trees.
So really serious gardeners (and I’m certainly one of them) just don’t have some tiny plastic bin to make their precious plant food and live soil enhancer, oh no… really serious gardeners have compost bays. Or, at least one big bay which can hold a large pile of garden matter and kitchen scraps in order to produce the heat and quantities needed for a… well… serious garden.
However, as much as I like to preach about the obvious benefits of composting I have to confess my old compost bays were rather poorly made from 2 x 2 garden stakes and re-used plastic roofing sheets. Initially, (since moving to our current property) my two composting bays were made in a hurry and were meant to be temporary but 6 + years later and although they served me OK my pathetic compost bays are looking more like a pumpkin patch rather than a compost heap!

My old compost heap bays – what a sad sight… (image above)
So I decided to knuckle down and finally build a proper compost area with not just one bay but three. Why three? Well, people use multiple composting bays typically as a production line by turning one bay into the next one as the compost matures at different levels – this is a very effective way to make compost.
For example, the first bay is stacked with compost and left to break down but the top of the heap will tend to take longer to mature. Therefore, once the bottom of the heap has matured nicely the pile is turned from the first bay into the second bay so that the bottom becomes top and the top is now covered and able to better break down. Finally, once the second bay has done its job the matured compost is turned into the third bay where it is kept for usage as required. All the while, new compost materials can be added to the first bay again (which would now be empty as per the example above) and the process continues.
Nevertheless, many people choose to have just one big bay and that’s fine too – it’s just a little harder to turn and manage. If two bays are used then one can at least be turned into the other so one bay is a compost maker and the other a storage area. Likewise, with three bays one can be used to make the compost, the 2nd can be used to store the matured compost, and the 3rd can be utilised as another storage area for manures like: horse, cow, and poultry poo.

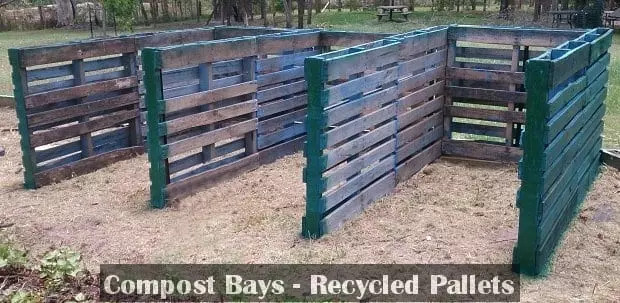
My new compost bays are much more solid, larger, and access is easy (image above)
My honest opinion is if at all possible and space permitting three compost bays is the best option for serious compost making. Naturally, three bays are harder to build than just one and more materials are required so that is why I looked for a cheaper option, which was greener and also made the job easier to do overall. And in the end I decided the best material to use for my “dream” compost bays project was wooden pallets.
Recycling old pallets to use as the main material for building compost heap bays saves lots of money. To build the same type of structure with wood purchased from a local hardware store would cost several hundred dollars.
However, money saving is not the only benefit as recycling is a big plus on its own and it’s certainly a greener way to use an old pallet than just wood chipping it. Also, pallets are very sturdy (so they’re easy to work with); made from hardwood (so less attractive to termites); and because they are built to hold at least 1 ton, pallets have to be well-made; therefore, the structure is likely to last a long time.
How to make 3 compost bays out of used pallets
So how did I make my palletised composting bays? It was easy, and using regular sized pallets made the job even easier because they are essentially ready-made panels which simply have to be joined together. It’s not rocket science and you may like to do yours slightly differently and just use my instructions as a guide for ideas – anyway, here’s how I did mine…

Materials required
- 11 pallets
- About 8 star pickets – To hold the pallets in place. I used old recycled posts because I had some already and they don't need to be new as they won't be seen once hammered into the inside of the pallets anyway.
- Quantity of long galvanised nails or wood screws – To secure the pallets together.
- 4 x 100 mil (10M) self-tapping sleeper bolts/coach screws (or longer ones) – These can be optional but I used them as an extra strong securing screw to join the middle of two pallets along the length of each bay.
- Some paint (I used 4 x touch-up spray cans).
Tools needed
- Drill (for screws and holes for the bolts)
- Hammer (for nails if not using wood screws)
- Sledge hammer (for the star pickets)
- Wrench or socket set (for screwing in the bolts)
Step 1 – Sourcing the pallets
I used 11 pallets for my 3 bay composting set-up and I got mine from several locations.
Standard loading pallets are used for moving or storing materials/goods and old ones can be found lying around everywhere like: industrial areas, out the back of shopping complexes/supermarkets, tyre shops, or even the rubbish tip, etc. Sometimes pallets with a broken or chipped boards are returned to the pallet manufacturer for repair but often they are abandoned or discarded to either become an eye saw or be carted to the dump and made into chip.
Obtaining some old pallets for free is as simple as asking the business if you can have them or if the pallets are obviously left by the industrial waste bins for rubbish collection then I see no harm in collecting them. Likewise, collecting the pallets from the local tip before they get crushed and turned into chip is a smart way to recycle building materials in my humble opinion.

Step 2 – Finding a location for the composting bays
Firstly, this composting bay set-up does take quite a bit of room at an overall length of 4.2 m by 2.35 m wide giving an internal space of 2.0 m x 1.2 per bay – obviously different sized pallets to mine will have different measurements.
Nevertheless, it doesn’t really matter what size pallets you use because no measuring is required for the build (except ensuring it will fit in the spot you want it) as the pallets are simply placed together like blocks.

It’s handy if the ground area for the bays is relatively level but this design works fine on a slight slope and it will just mean the bays will step down.
The other considerations for sighting the compost bays are to ensure they are accessible but not too close to the house. Therefore, the bays need to be sighted on good standing, easily accessed with a wheelbarrow, and at least 10 metres from any dwelling because compost heaps can attract rodents and sometimes smell a little so it’s best not built next to the home. I have positioned my composting bays to the rear of my vegetable garden because this is where most of my garden action happens.
Step 3 – Positioning the pallets
Now it’s just a matter of standing up the first pallet for one side and securing it with a star picket so it keeps upright.
Then, work down the back of the bays by positioning a rear pallet panel followed by another side and a rear until there are three rear panels and four sides all positioned up against each other and held into place with a star picket. It's possible not all rear panels will require a star picket to hold in place because they will be secured together anyway with screws/nials later but certainly use a star picket for each pallet if required.
Once the half bays are all positioned then add the remaining four pallets at the end of each side to extend the bays out to full size. Hold these final pallets in place by hammering in a star picket in at the very end of each row.
Step 4 – Securing the structure
Once all the panels are positioned together they can be secured to each other by nails or screws wherever appropriate so the structure feels nice and solid. The two side pallets (4 sets) can be secured together in the middle with one blot for extra support – it might be best to pre-drill a hole slightly smaller than the bolts to help prevent wood splitting as the bolts are screwed into the hardwood.

Step 5 – Paint
It isn’t really necessary to paint the compost bays but just for looks and a bit of weather protection I gave mine a light spray paint on the outside of the structure (green).

Painted compost bays (image above)
Conclusion
That’s all there is to building a set of three composting bays it doesn’t have to look pretty, after all, it only holds green recycled waste but it does need to work and this design does the job whilst still being good on the hip pocket.
The three bay design also enables easy turning of the heaps and a holding bay for made compost or even manures so they can mature before being used in the garden.
Compost can be purchased from a gardening centre at about $8 per 25 litre bag which doesn’t go far and is awfully expensive, or, heaps of rich compost can be made at home from garden waste and kitchen scraps for free – I know which one I’d prefer…
I'm happy to discuss this compost bay build on our forum and show more pics if you'd like to ask questions or give suggestions.
Mark Valencia – Editor SSM
Look, and see the Earth through her eyes…